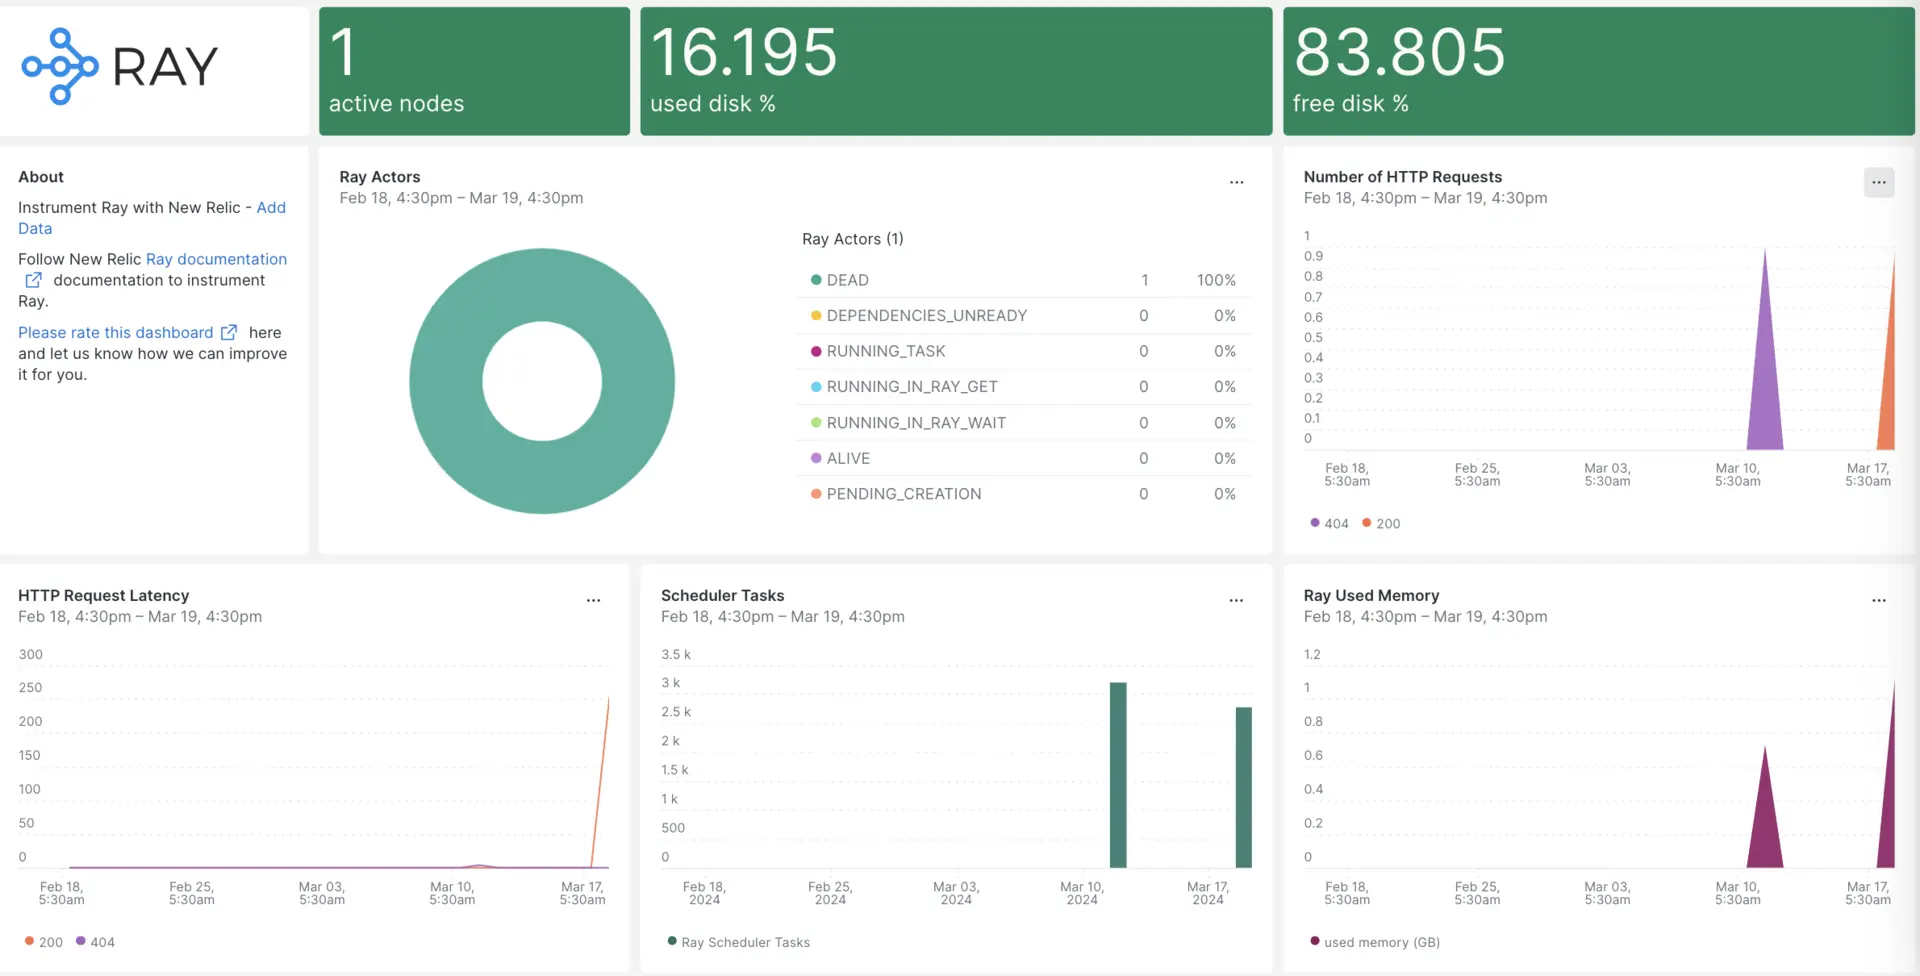
Nuestra integración Ray monitorea el rendimiento de su Ray, ayudándolo a diagnosticar y optimizar el clúster Ray, tareas de ML como preprocesamiento de datos, capacitación distribuida, ajuste de hiperparámetros, aprendizaje por refuerzo y servicio de modelos y escalamiento de la aplicación Python. Nuestra integración Ray hace uso de nuestro agente de infraestructura y NRI-Prometheus le brinda un dashboard prediseñado con su métrica Ray más importante.

Después de configurar la integración con New Relic, vea sus datos en un panel como este, listo para usar.
Instalar el agente de infraestructura
Para emplear la integración de Ray, primero debe instalar el agente de infraestructura en el mismo host. El agente de infraestructura monitorea el propio host, mientras que la integración Ray extiende su monitoreo con datos específicos del clúster Ray.
Instalar la integración de Prometheus
Descargue la última versión de Prometheus desde la página de descarga de Prometheus. Seleccione la versión adecuada para su sistema operativo y arquitectura. Para Linux, probablemente elijas la versión linux-amd64. Copie el enlace de descarga del archivo tarball (archivo
.tar.gz).Una vez descargado Prometheus, extraiga el archivo tar de descarga:
bash$tar -xvzf <filename.tar.gz>Navegue hasta la carpeta Prometheus extraída y ejecute el siguiente comando para iniciar el servicio Prometheus:
bash$cd /DOWNLOADED-FOLDER/bash$./prometheus --config.file=/tmp/ray/session_latest/metrics/prometheus/prometheus.ymlCuando se inicia Prometheus, opera en el puerto 9090. Navegue a la interfaz web de Prometheus, seleccione
Statusy haga clic en el objetivo deseado para ver las URL del extremo Ray métrica, como se muestra a continuación:http://YOUR_DOMAIN:64415/metrics, http://YOUR_DOMAIN:44217/metrics, http://YOUR_DOMAIN:44227/metrics
Configurar nri-prometheus
Cree un archivo llamado
nri-prometheus-config.ymlen la siguiente ruta:bash$/etc/newrelic-infra/integrations.dAgregue el siguiente fragmento a su archivo
nri-prometheus-config.ymlque permite al agente capturar datos de Ray:integrations:- name: nri-prometheusconfig:standalone: false# Defaults to true. When standalone is set to `false`, `nri-prometheus` requires an infrastructure agent to send data.emitters: infra-sdk# When running with infrastructure agent emitters will have to include infra-sdkcluster_name: Ray_Metrics# Match the name of your cluster with the name seen in New Relic.targets:- description: Ray_Metricsurls: ["http://<YOUR_HOST_IP>:64747/metrics", "http://<YOUR_HOST_IP>:44217/metrics", "http://<YOUR_HOST_IP>:44227/metrics"]# tls_config:# ca_file_path: "/etc/etcd/etcd-client-ca.crt"# cert_file_path: "/etc/etcd/etcd-client.crt"# key_file_path: "/etc/etcd/etcd-client.key"verbose: false# Defaults to false. This determines whether or not the integration should run in verbose mode.audit: false# Defaults to false and does not include verbose mode. Audit mode logs the uncompressed data sent to New Relic and can lead to a high log volume.# scrape_timeout: "YOUR_TIMEOUT_DURATION"# `scrape_timeout` is not a mandatory configuration and defaults to 30s. The HTTP client timeout when fetching data from endpoints.scrape_duration: "5s"# worker_threads: 4# `worker_threads` is not a mandatory configuration and defaults to `4` for clusters with more than 400 endpoints. Slowly increase the worker thread until scrape time falls between the desired `scrape_duration`. Note: Increasing this value too much results in huge memory consumption if too many metrics are scraped at once.insecure_skip_verify: false# Defaults to false. Determins if the integration should skip TLS verification or not.timeout: 10s
Reenviar log de Ray a New Relic
Puede utilizar nuestra capacidad de reenvío de logs para reenviar el log de Ray a New Relic.
Edite el archivo de registro llamado
logging.ymlubicado en la siguiente ruta:bash$cd /etc/newrelic-infra/logging.d/Agregue el siguiente script al archivo
logging.yml:- name: dashboard.logfile: /tmp/ray/session_latest/logs/dashboard.logattributes:logtype: ray_dashboard_logs- name: monitor.logfile: /tmp/ray/session_latest/logs/monitor.logattributes:logtype: ray_monitor_logs- name: log_monitor.logfile: /tmp/ray/session_latest/logs/log_monitor.logattributes:logtype: ray_log_monitor_logs
Reiniciar el agente de infraestructura.
Utilice las instrucciones de nuestros documentos del agente de infraestructura para reiniciar su agente de infraestructura. Este es un comando básico que debería funcionar para la mayoría de las personas:
$sudo systemctl restart newrelic-infra.serviceVisualiza tu Rayo métrico en New Relic
Una vez que haya completado la configuración anterior, podrá ver su métrica utilizando nuestra plantilla dashboard prediseñadas. Para acceder a este dashboard:
Vaya a one.newrelic.com > + Integrations & Agents.
Haga clic en la pestaña del Dashboards .
En el cuadro de búsqueda, escriba
Ray.Selecciónelo y haga clic en Install.
Para instrumentar el Apache Druid inicio rápido y ver métricas y alertas, también puedes seguir nuestra página Ray inicio rápido haciendo clic en el botón Install now.
Aquí hay una consulta de ejemplo para verificar los nodos activos en su clúster Ray:
SELECT latest(ray_cluster_active_nodes) FROM Metric
¿Que sigue?
Para obtener más información sobre cómo crear una consulta NRQL y generar un panel, consulte estos documentos:
- Introducción al generador de consultas para crear consultas básicas y avanzadas.
- Introducción al panel para personalizar tu dashboard y realizar diferentes acciones.
- Administre su dashboard para ajustar el modo de visualización de su panel o para agregar más contenido a su dashboard.