Alerts notification integrations allow you to connect specific services and platforms to the New Relic platform. You can use these connections to send notifications from New Relic. Through these notifications you get information about issues that need a review or that help you to take a decision about a detected problem.
Integration details
Read more about each of our specific notification integrations.
Integrate New Relic with Atlassian Jira (Cloud) and automatically create, update, and close Jira issues.
Permissions
重要
This integration doesn't support JIRA on-premises or data center installations.
The required permissions from the Jira API-Token are BROWSE_PROJECTS, ASSIGN_ISSUES, CLOSE_ISSUES, CREATE_ISSUES, EDIT_ISSUES, RESOLVE_ISSUES, TRANSITION_ISSUES, USER_PICKER, and ADD_COMMENTS.
To enable the two-way sync toggle, the provided Jira API-Key must have an Admin role.
Set up a Jira destination
Create Jira issues, then enable Jira and New Relic to share updates, and stay synced.
To create a Jira destination follow these steps:
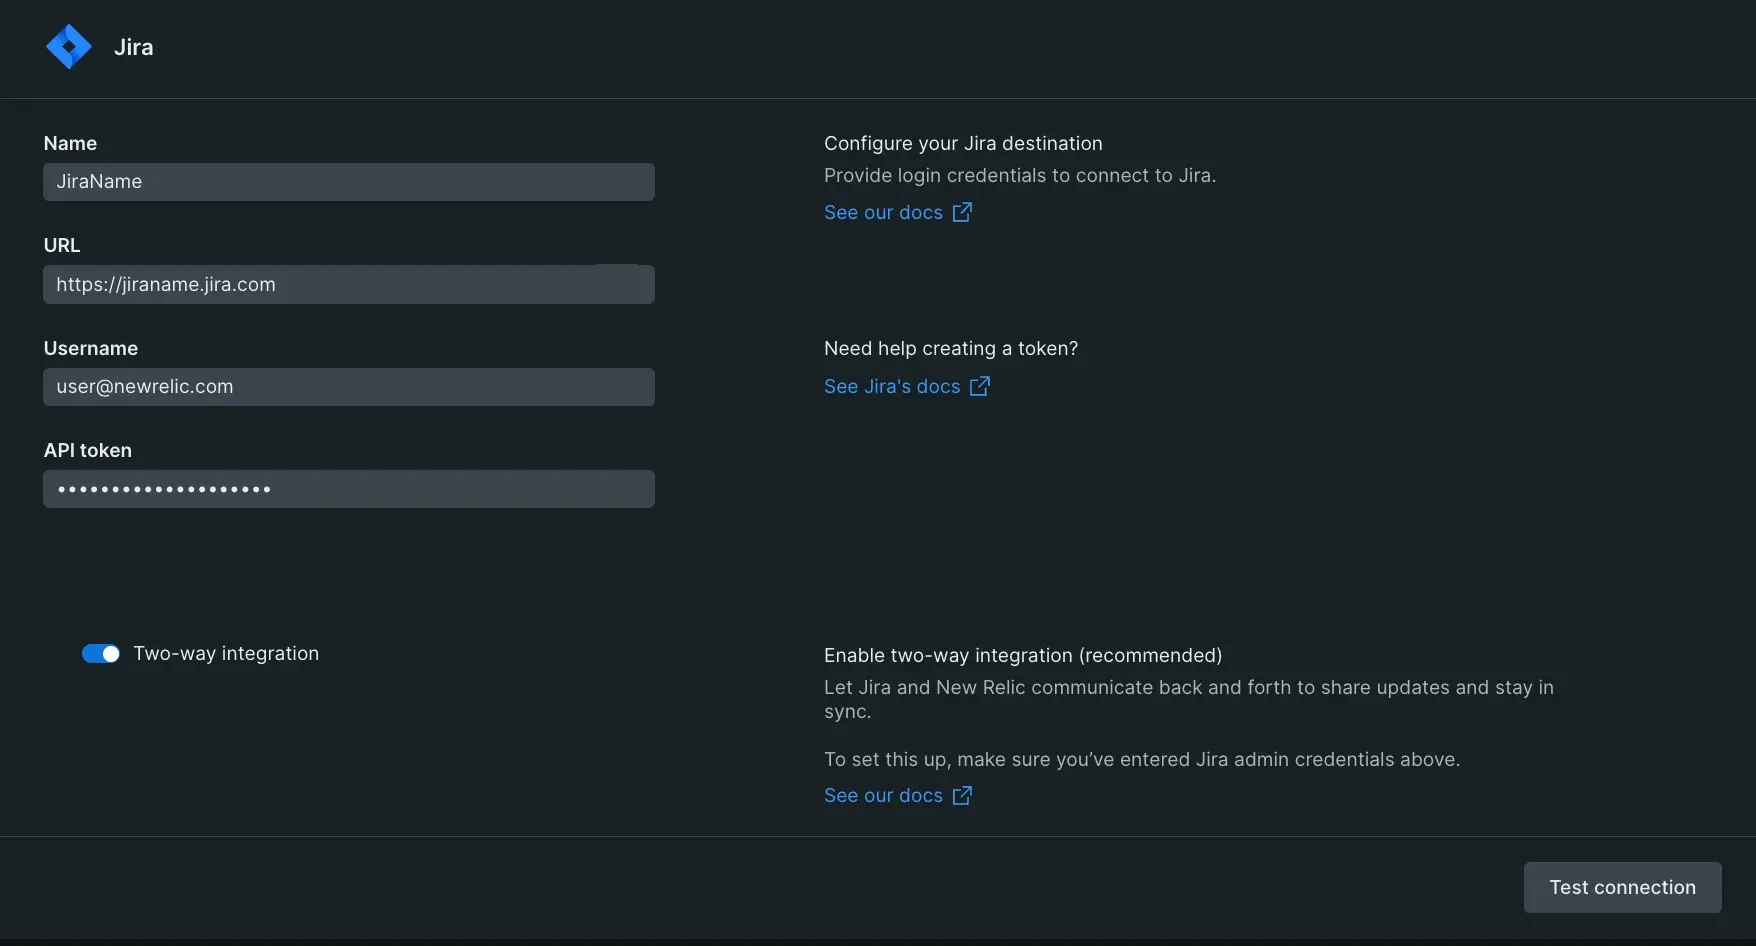
Go to one.newrelic.com > All capabilities > Alerts, click Destinations, and then select Jira.
Enter the following information:
- Name: Custom name to identify the destination.
- URL: The URL of the destination.
- Username: The email address of the user.
- API token: generated from your Atlassian account.
Before saving the destination, we recommend you click the Test connection button to check your connection.
Two-way sync
Two-way sync is applicable for workflows. To enable it, turn on the two-way integration toggle.
When turned on, a Jira Webhook is created in your Jira account. The webhook contains access details to New Relic (URL and API key).
Sync with New Relic workflows
Closure of a New Relic issue triggers when the Jira issue status changes to
done.Acknowledgment of New Relic issue triggers when the Jira issue status changes to
in-progress.Configure the message template in Workflows
To configure a template for a Jira issue follow these steps:
Go to one.newrelic.com > All capabilities > Alerts > Workflows and click on an existing workflow, or click the + Add a new workflow button.
Choose an existing destination or create a new one.
Once you've connected to the destination, choose a project, then select the Jira issue type to use.
After selecting the issue type, the configured project's fields automatically map to your Jira instance.
To help you get started, we automatically populate the required and recommended fields and values. Ensure that you've included a value in all required fields before proceeding.
Send a test notification
Click a test notification with default field values to see the Jira issue. If successful, you'll have a link to view the incident in Jira.
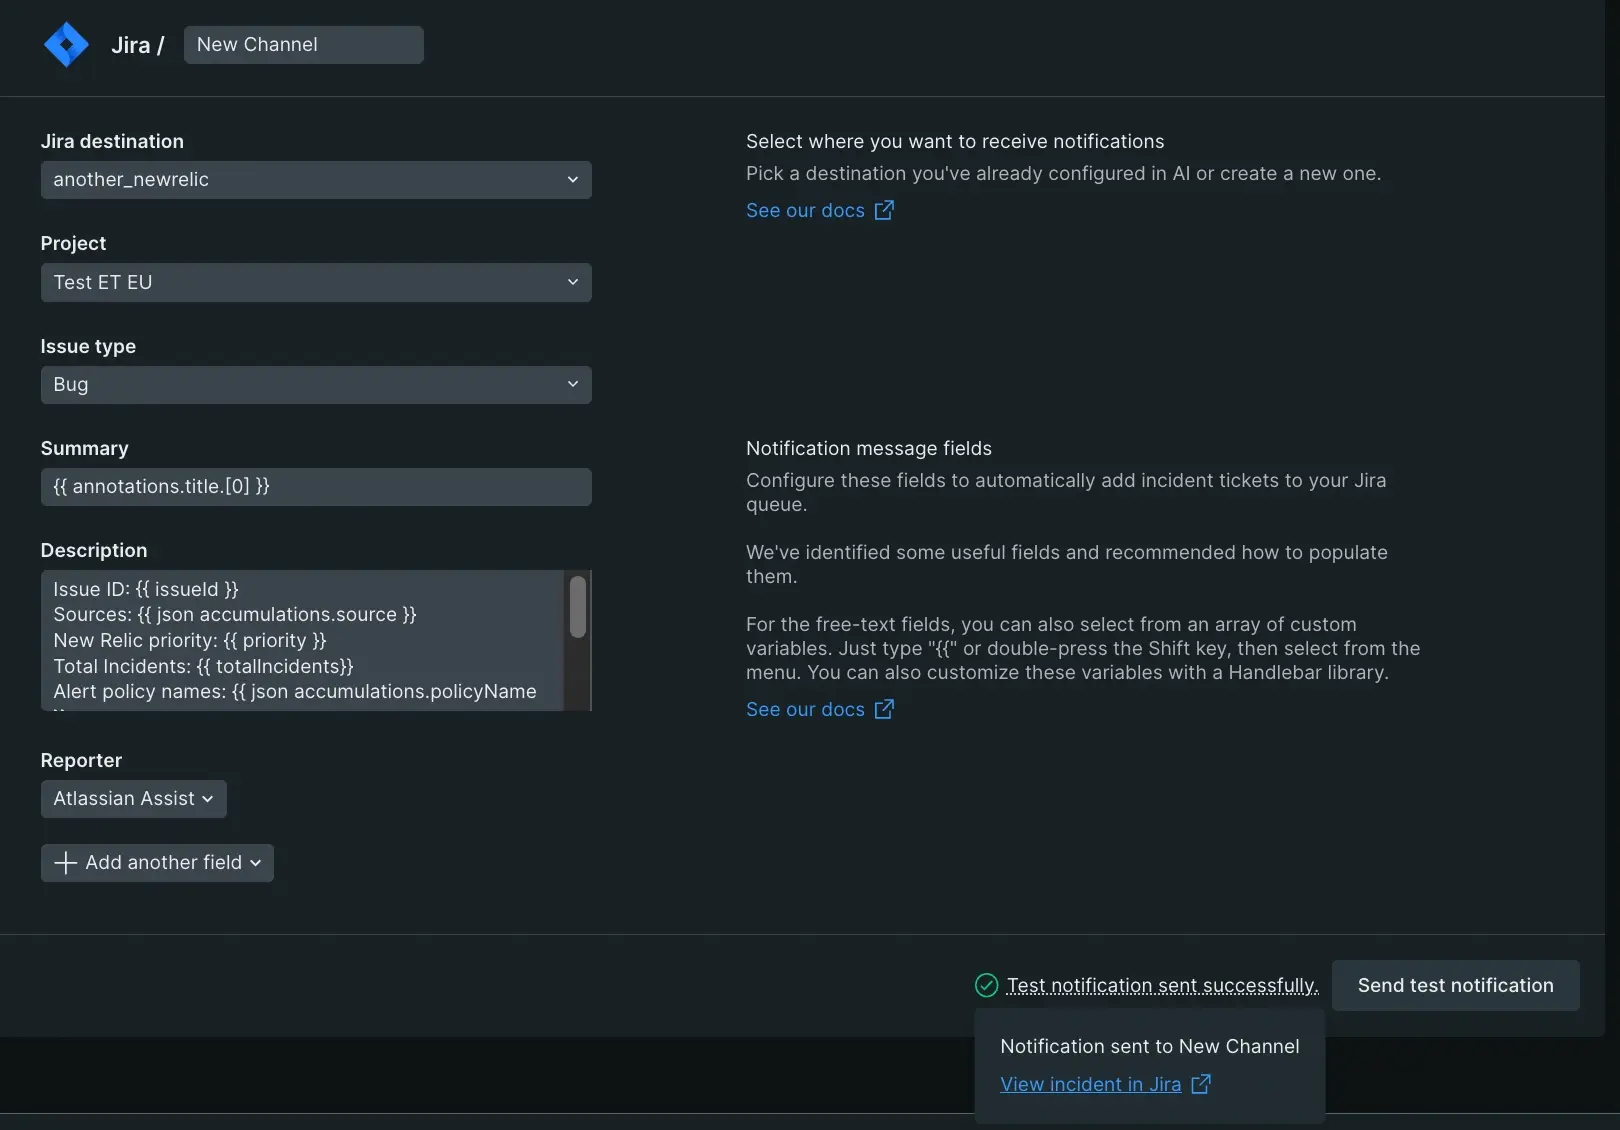
Jira notification message template.
Use New Relic and AWS EventBridge to customize and deliver notifications to targets like AWS Lambda, Amazon simple notification service (SNS) queues, CloudWatch logs, and more.
Set up an EventBridge destination
重要
New Relic is listed in AWS as a SaaS Partner Event Source.
To create an AWS EventBridge destination follow these steps:
Go to one.newrelic.com > All capabilities > Alerts, click Destinations, and then select AWS EventBridge.
Enter the following information:
Name: Custom name to identify the destination.
AWS region: This is your AWS regional endpoint. Select the region where your event source is hosted.
AWS account ID: Your AWS account ID. This is a 12-digit number.
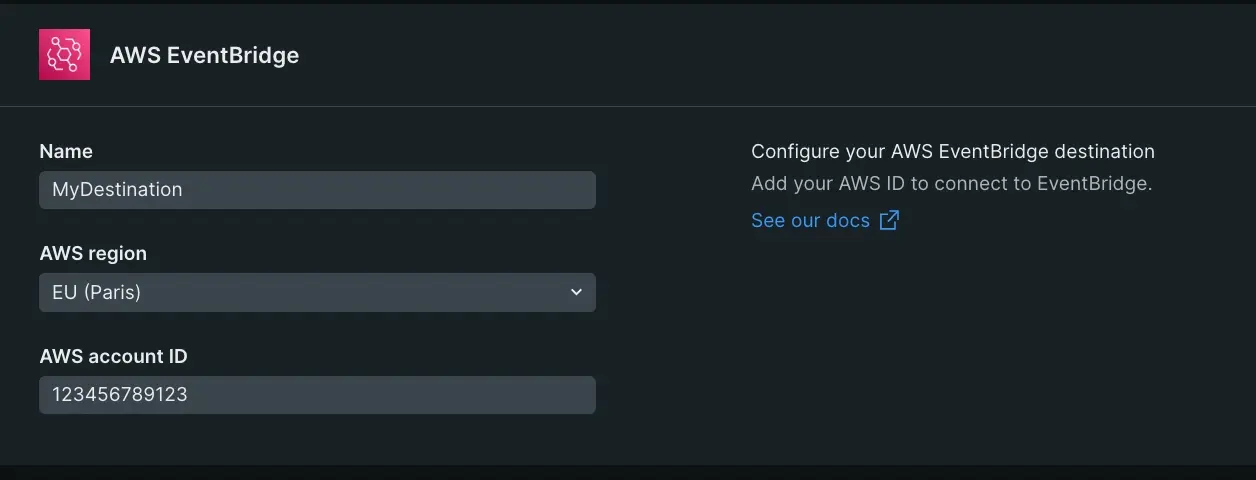
Choose your event source
Once you've configured your EventBridge destination with your AWS account ID, when you create a new event source, it's available in EventBridge.
Select or create a destination name.
Select or create an event source.
When you create a new event source, it's created in your AWS EventBridge account as an integration partner event source.
Associate the event-source in your AWS account, and create a rule
To associate the event source with an event bus:
In the AWS EventBridge console, choose Partner event sources in the navigation pane.
Select the button next to the partner event source and then choose Associate with event bus.
The status of the event source changes from Pending to Active, and the name of the event bus updates to match your event source name. You can now start creating rules that match events from New Relic.
Create a rule for the event bus.
To react to notifications sent from New Relic, you need to create rules with an event-pattern that filters-in New-Relic events.
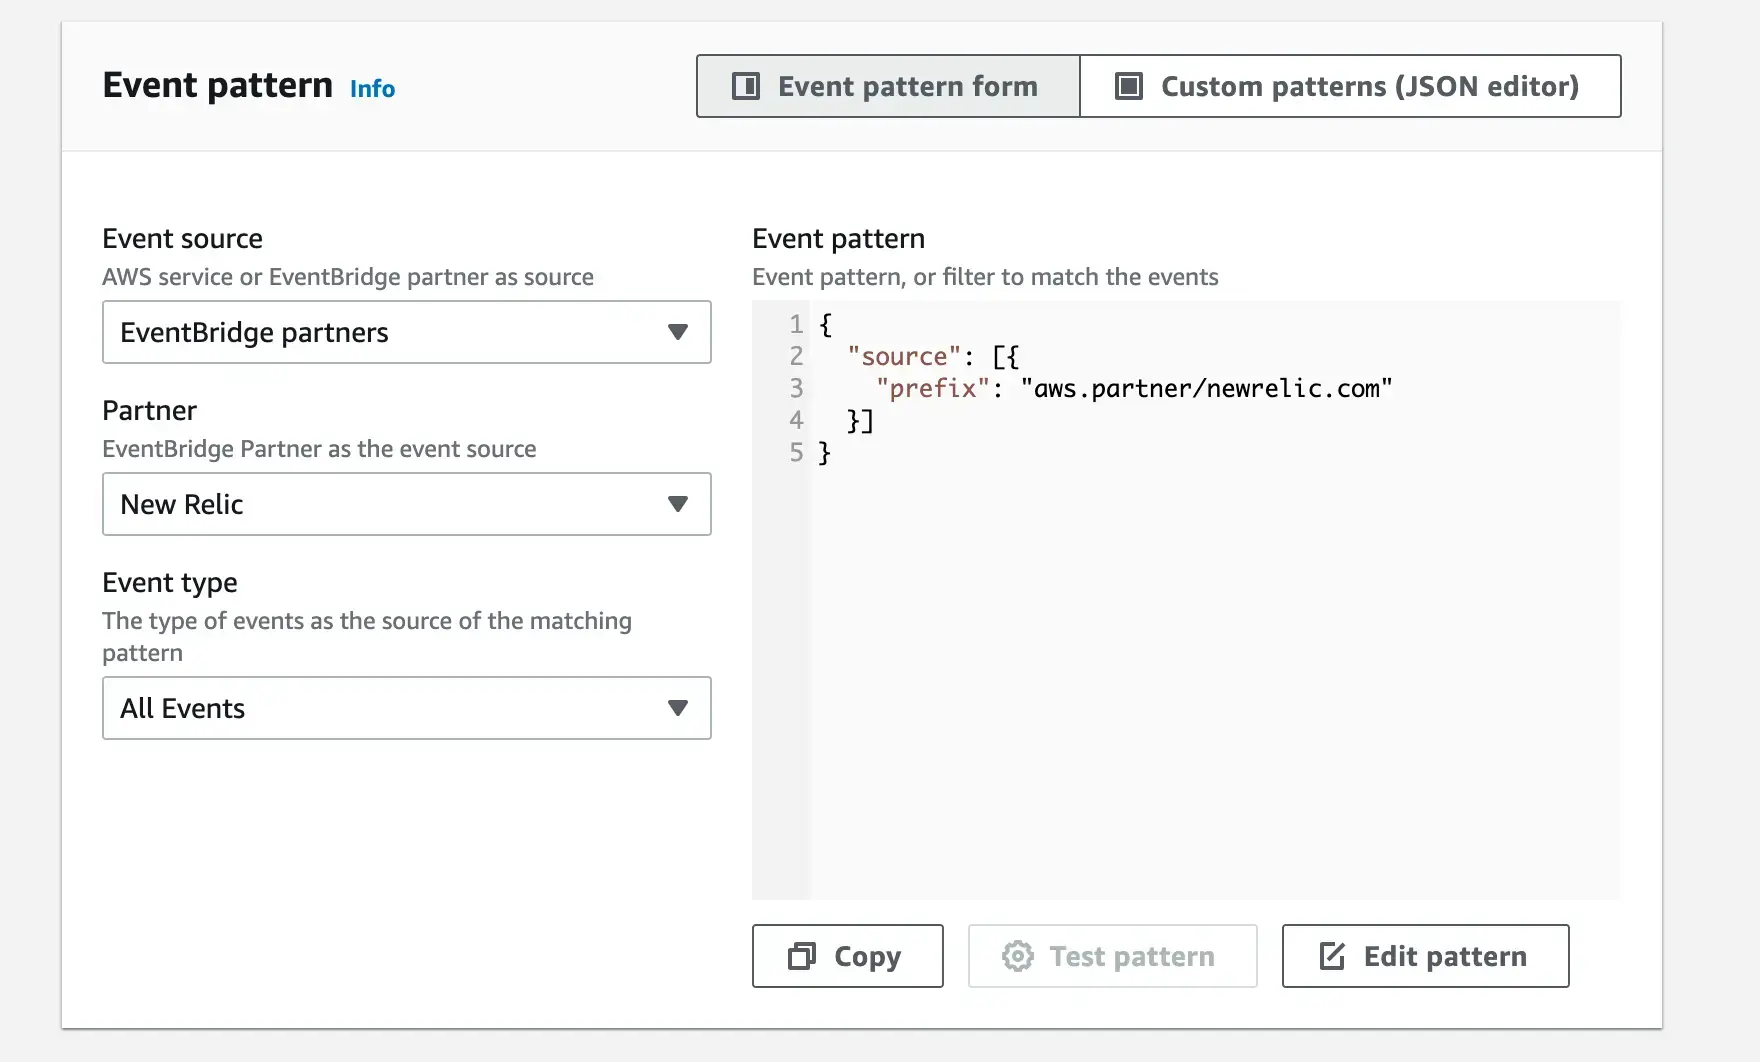
Use this AWS doc on how to create an event source rule for more detailed instructions.
Configure the message event template in workflows
Navigate to Workflows, click on an existing workflow or the Add a new Workflow button, and choose the EventBridge destination. When you send notifications from New Relic to EventBridge, you can use a message template to customize that notification.
You can use the default template or customize your own. Choose Variables from the variables menu and apply handlebars syntax to enrich your events.
The EventBridge API requires JSON, and the template preview displays the rendered JSON. Once the event template conforms to a valid JSON, you can send a test notification to AWS EventBridge. See our JSON usage examples for more information.
The email destination is created automatically when you choose Email as the notification channel for a workflow, so you don't need to configure that from the Destinations menu. Each email destination is unique to the workflow associated with it, and this means that it may appear as a duplicate in the destinations feed.
To configure workflow for alerts in email notification:
Go to one.newrelic.com > All capabilities > Alerts.
Select Workflows on the left navigation panel.
Click + Add a workflow.
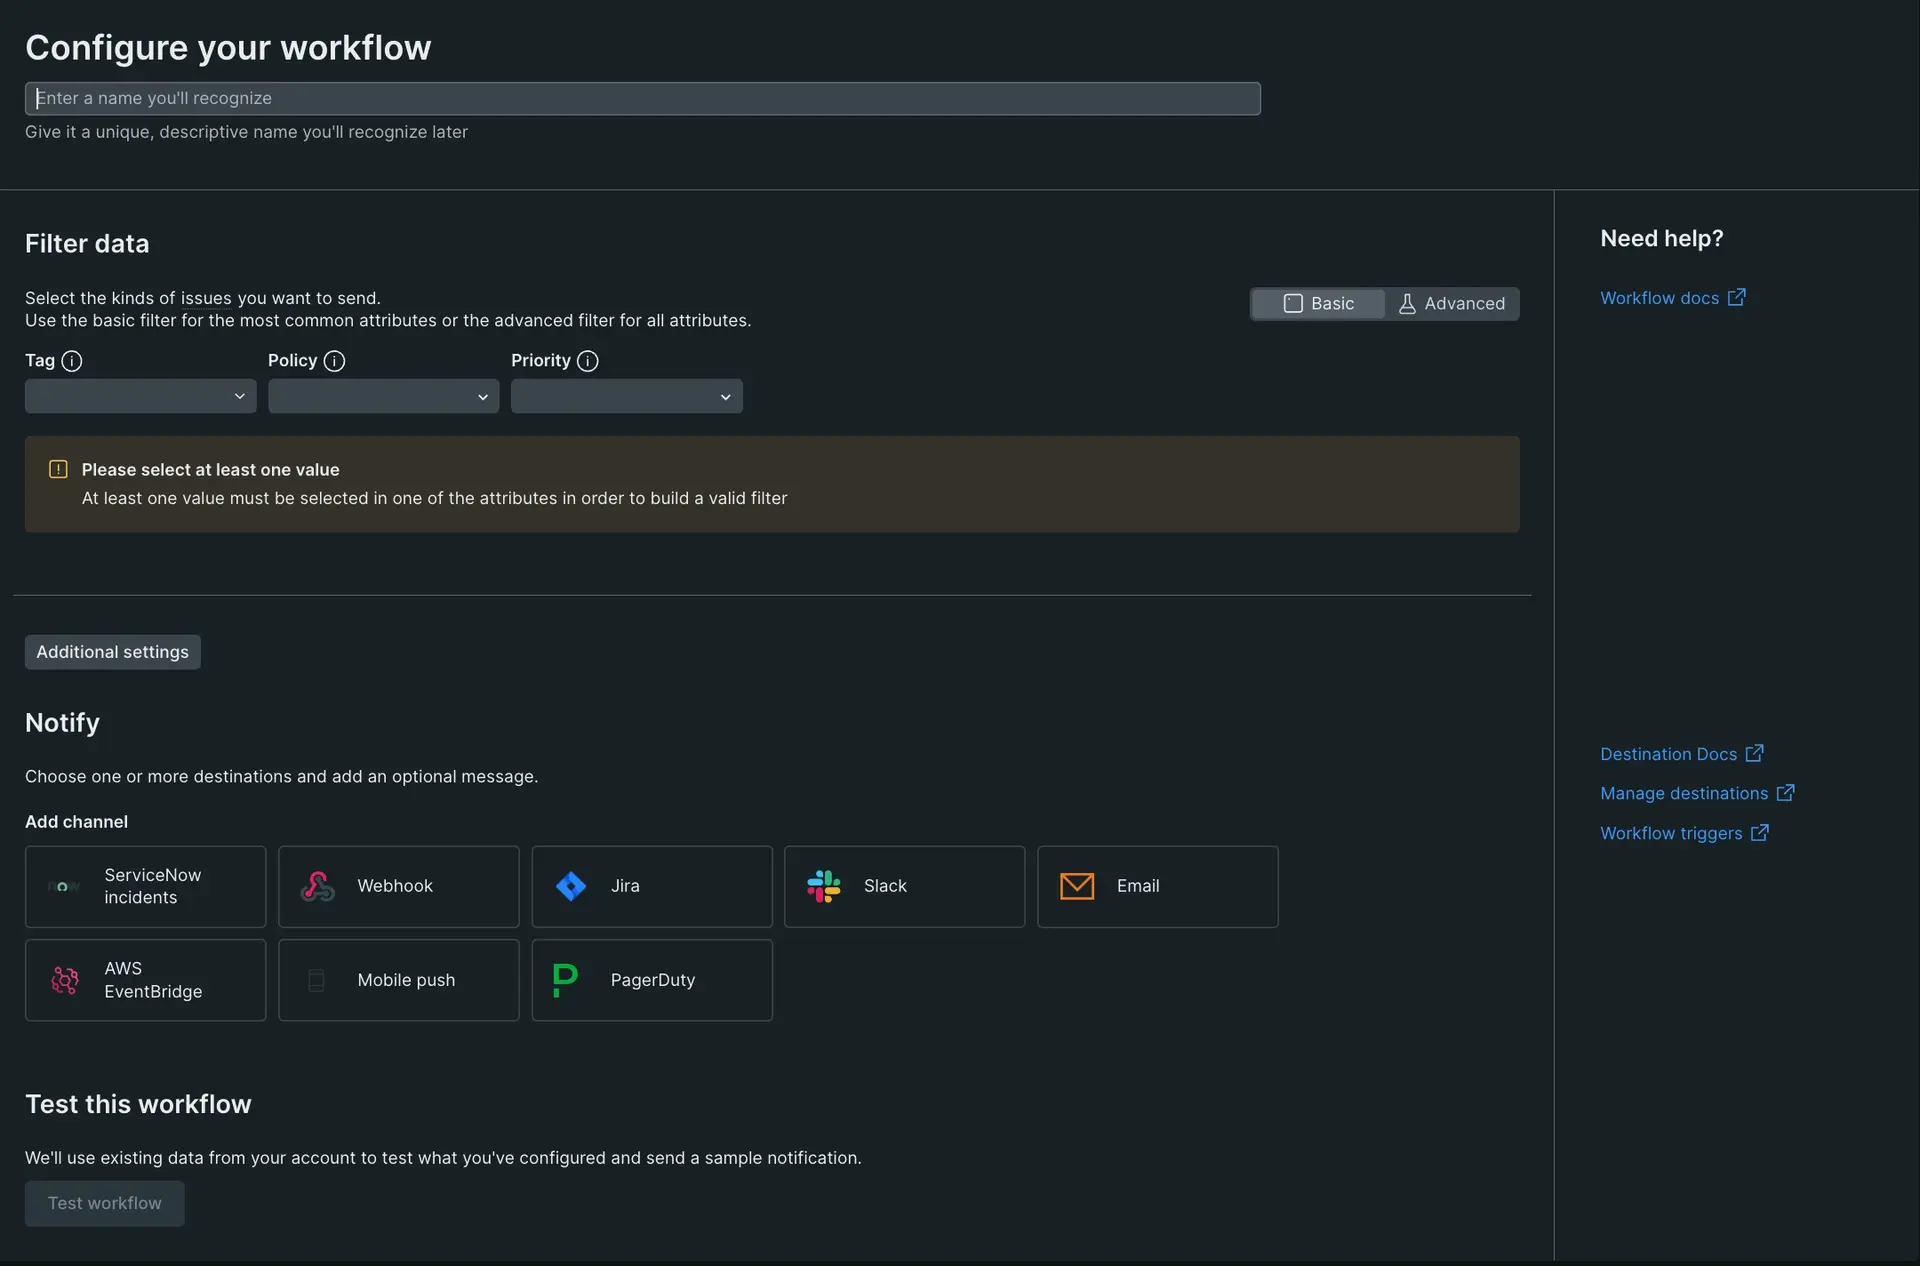
Name your workflow. This field is mandatory and needs to be unique.
Filter the data you need. You can choose between Basic and Advanced options to add the issues you want to send.
To enrich your data or configure notification settings for muted issues, click Additional settings.
- To enrich data, enable Enrich your data, build NRQL query, then save and exit.
- To configure notification settings for muted issues, choose one of the available option as per your requirement.
Select Email as notification method.
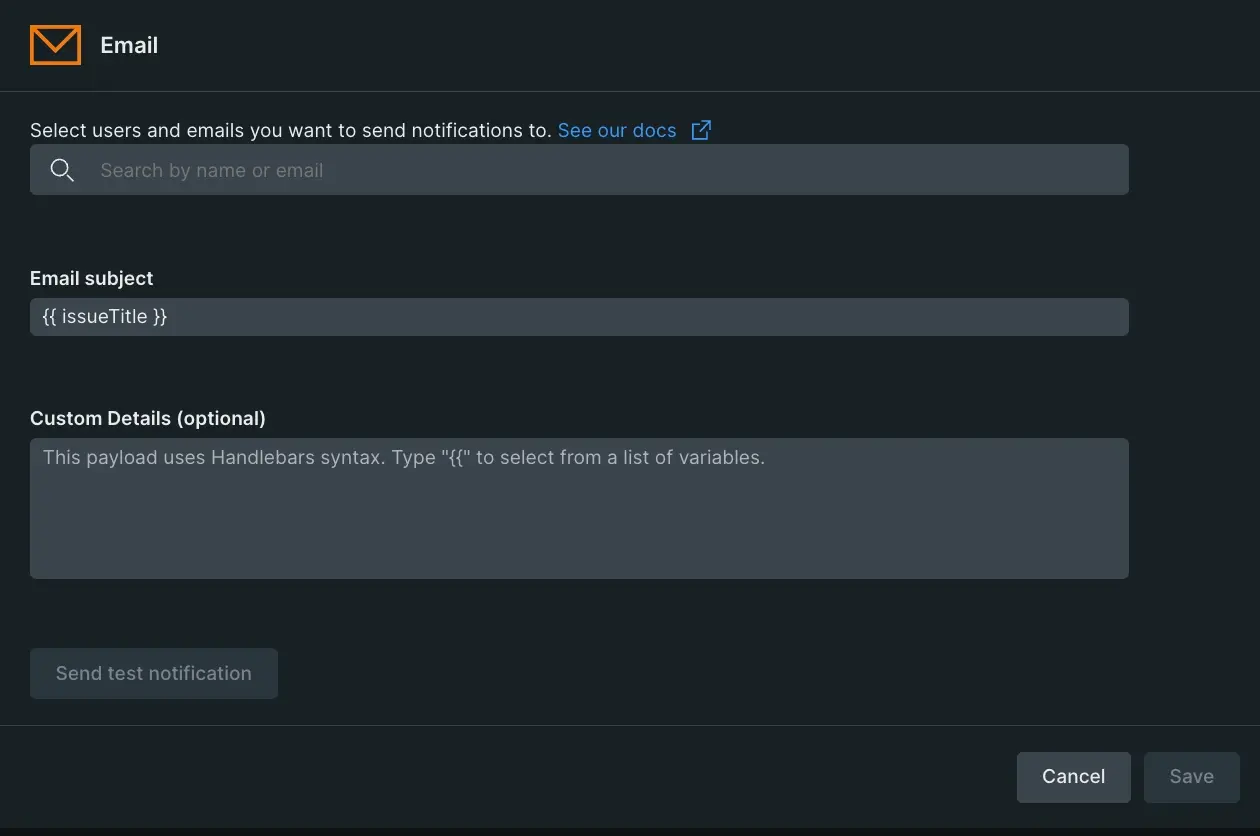
Add recipients: Type the recipient name or email address. Destinations having that user will appear in the feed - choose one. If you want to create a new destination for the user:
From the feed click Create new destination.
On the Add a destination page, add recipients by searching their email ID or username, enter a unique name for the destination, and save.
If an email address is already associated with an existing destination, you'll be prompted to merge them. Select Merge to combine destinations.
If you have added a new email address, the recipient will receive a verification email. The recipient must complete the verification process to start receiving notifications.
重要
Email destination limits:
- Free accounts: Each destination can have a maximum of 5 email addresses.
- Paid accounts: Each destination can have a maximum of 150 email addresses.
- Organization limit: 1000 unique email addresses can be added per customer organization per 24 hours (applies to all users).
Customize the email message.
- For the email subject, you can use the default payload or customize it to contain the required data.
- The email body includes default data that can't be changed but you can also add your own customized additional details. These customizations appear under the Custom Details section.
- To enrich the email, pick variables from the variables menu and apply handlebars syntax.
Click Send test notification to make sure the email notifications reach the inbox.
Click Save.
Click Activate workflow.
ヒント
You can keep track of all notifications generated for the email per destination in the notifications log.
From the Workflow main page, you can enable, edit, delete, or copy workflow id to clipboard the created workflow.
Send notifications from New Relic to Microsoft Teams. For more information, refer New Relic integration for Microsoft Teams.
Send push notifications to your New Relic iOS or Android mobile apps.
Set up a mobile push destination
To create a mobile push destination, you need the following:
Push destination name: A unique destination name.
User id: This will be automatically filled in based on the current logged in user.
重要
Currently, you can only create mobile push destinations for the current logged in user with modify capabilities. You can also only create a single push destination for your user. If you try to create more then one, an error will display. Before saving the destination, we recommend you test the connection using the Test connection button.
Configure when to receive push notifications in workflows
Go to one.newrelic.com > All capabilities > Alerts > Workflows and click on an existing workflow, or the +Add a new workflow button and choose the mobile notifier. To configure a mobile push, click on the mobile notifier and select the desired destination.
Webhook template for Atlassian Opsgenie
Send notifications from workflows to Opsgenie using using a webhook template: Opsgenie webhook template for workflows
Integrate New Relic with PagerDuty to automatically create, update, acknowledge, and resolve PagerDuty incidents.
We offer two ways to integrate with PagerDuty:
Account level integration using REST API Keys (recommended): This fully automatic integration supports two-way sync and the ability to define multiple PagerDuty services on a single New Relic destination.
Service integration using Events API keys: This single service integration uses the service level integration key, and requires a separate New Relic destination for each unique PagerDuty service.
Account level integration
This fully automatic integration supports two-way sync and the ability to define multiple PagerDuty services on a single New Relic destination.
Permissions
This integration requires permission to perform the following actions:
This integration requires a REST API Key. PagerDuty has two types of REST API keys:
General access key: It includes all the permissions listed above and PagerDuty admins and account owners have access. See PagerDuty instructions.
Personal user tokens: If your account has advanced permissions, you can create unique personal REST API keys. Requests made using personal REST API keys are restricted to the user's permissions. If you choose to provide a user token API key, make sure it has the required permissions described above. See PagerDuty instructions.
ヒント
For personal user tokens, we recommend you use a dedicated integration user that does not belong to a real user.
During the creation of an account level destination, we create a service integration. Do not delete this integration, as we use that key!
Set up a destination
To create a PagerDuty destination:
Go to one.newrelic.com > All capabilities > Alerts, click Destinations, and then select PagerDuty.
Enter the following information:
Name: Custom name to identify the destination.
API Key: For this integration, you will be asked to provide a REST API Key. There're two types of REST API keys in PagerDuty, general access and user tokens.
Before saving the destination, we recommend testing the connection by clicking the Test connection button.
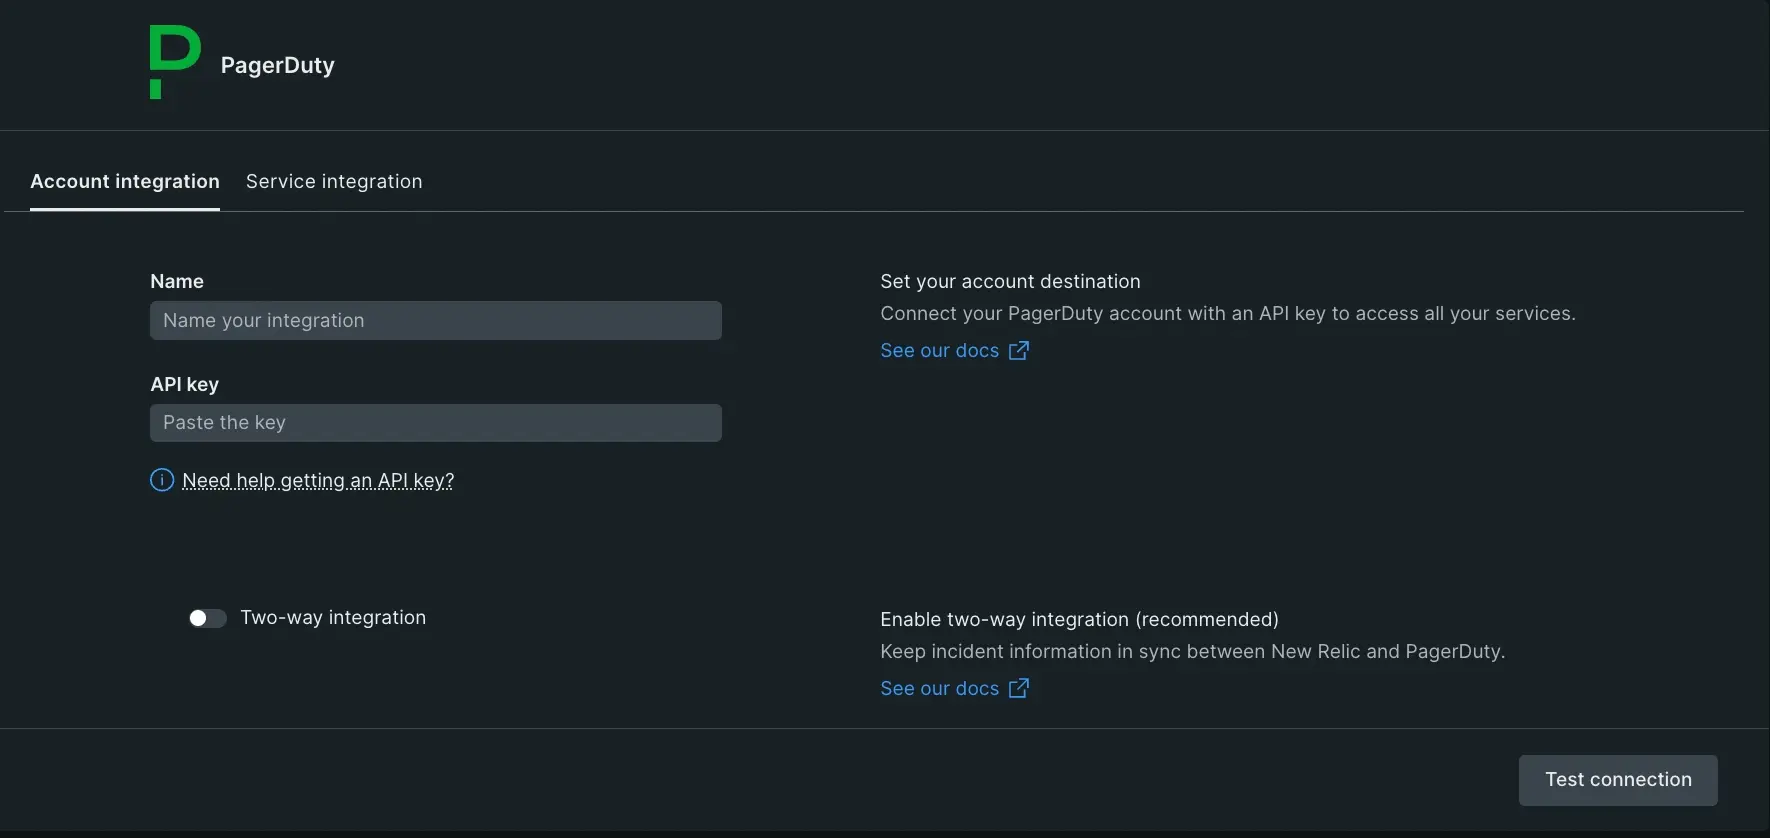
Two-way sync
To enable two-way sync, turn on the two-way integration toggle. When turned on, a PagerDuty subscription is created at a later stage for the selected PagerDuty service (see customize a message template). The webhook contains access details to New Relic (URL and New Relic API key). By default, any change of state to the PagerDuty incident created by New Relic will sync back to New Relic.
重要
If you're a PagerDuty Event Intelligence or Digital Operations customer using Intelligent Alert Grouping on a given service, potential mismatches in PagerDuty incidents sent back to New Relic may occur.
Sync with New Relic workflows
The closure of a New Relic issue is triggered when the PagerDuty incident is resolved.
The acknowledgment of a New Relic issue is triggered when the PagerDuty incident is acknowledged.
Configure the message template in workflows
To configure the message template:
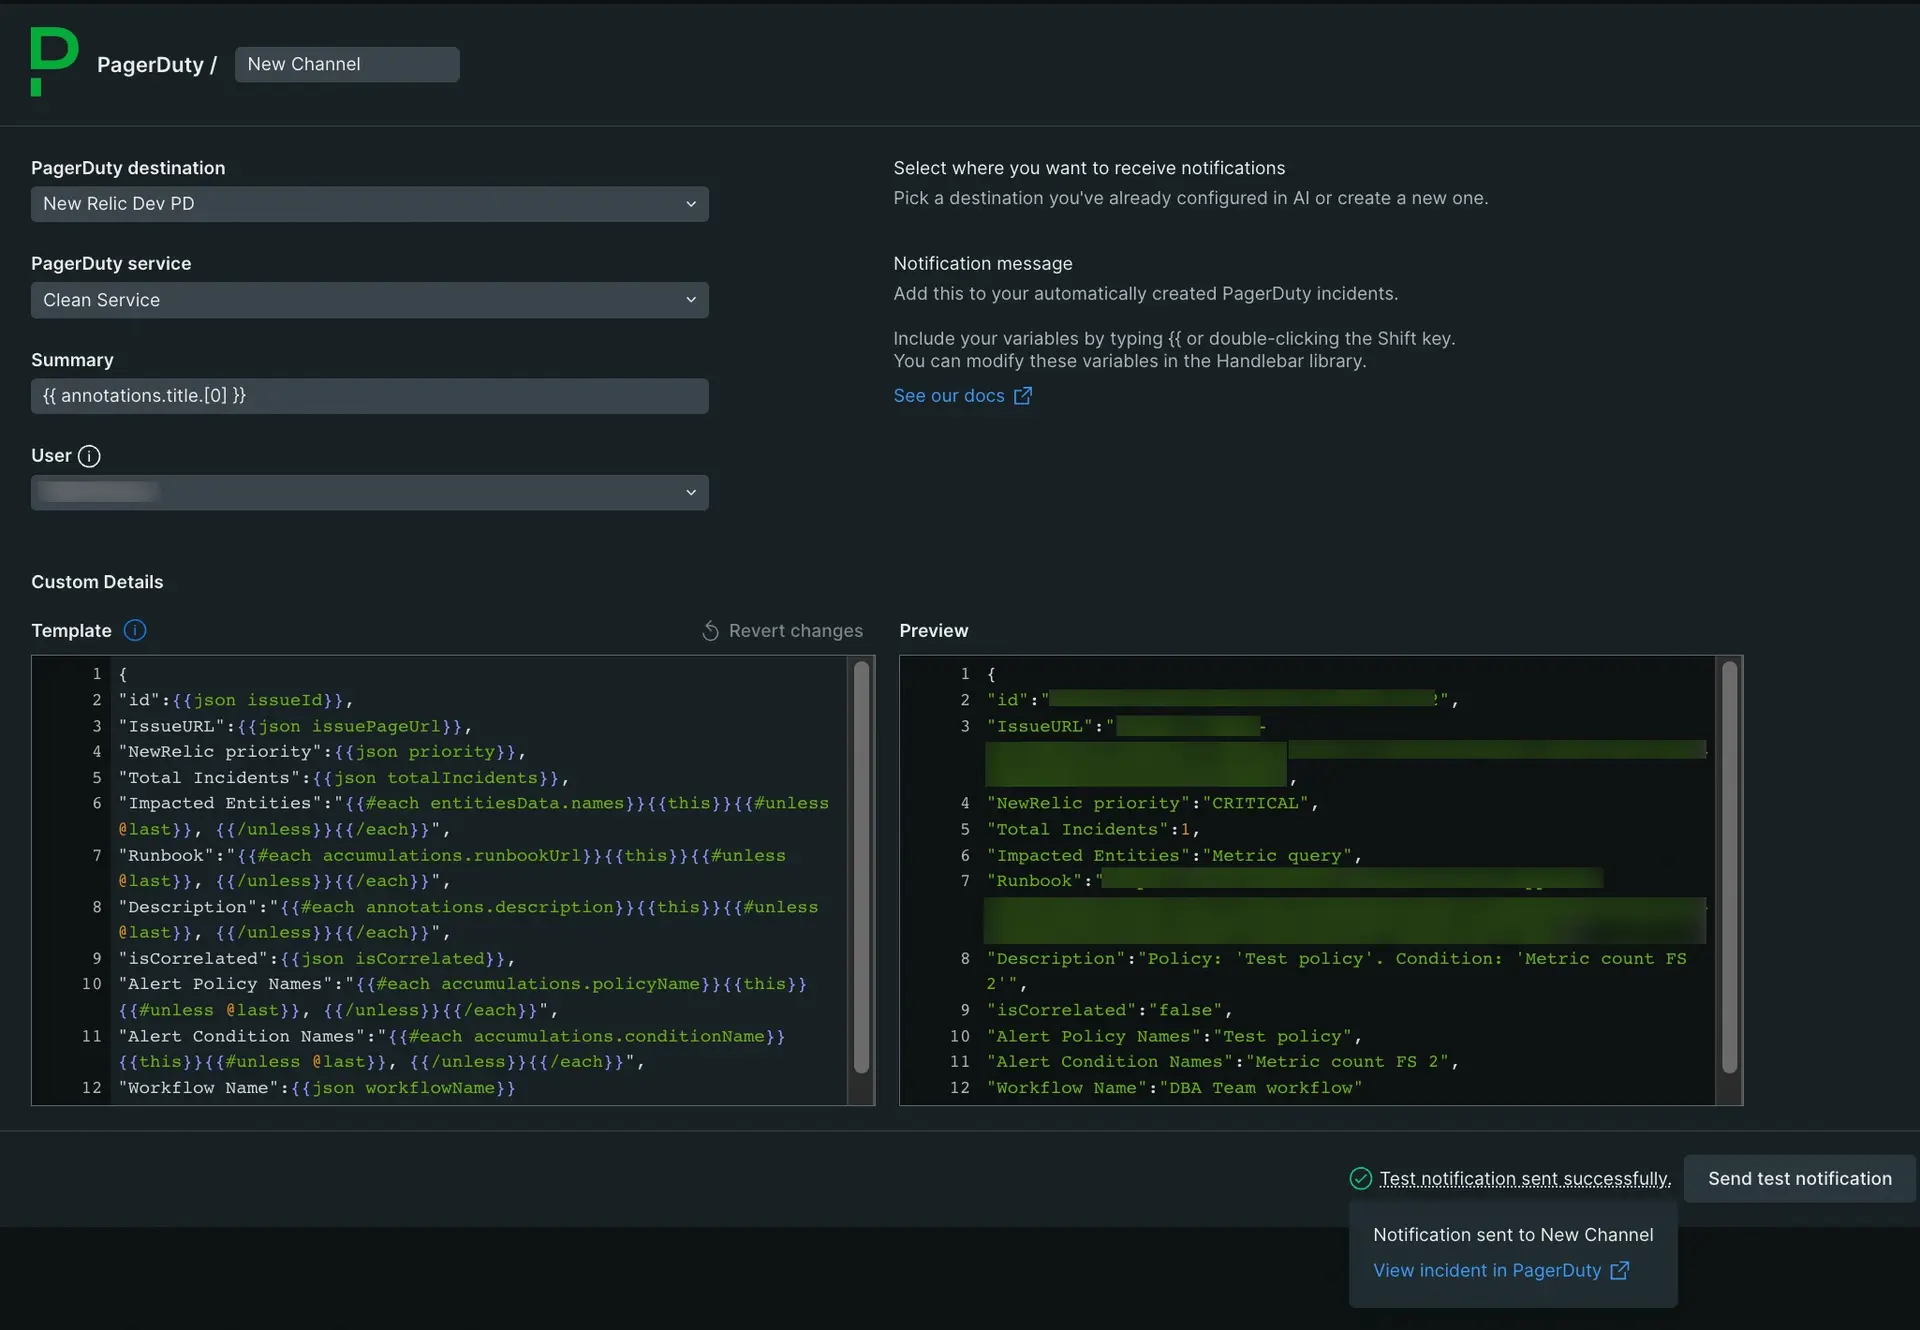
- Go to one.newrelic.com > All capabilities > Alerts> Workflows and click on an existing workflow, or the + Add a new workflow button and choose the PagerDuty notifier.
- Choose a destination, or create a new one.
- Select a PagerDuty service.
- Select a user. New Relic will post notes in behalf of selected user.
- Send details to the Custom Details section in Pagerduty. You can use the default payload or customize it using free text or dynamic variables from the issue payload. Pick variables from the variables menu and apply handlebars syntax to enrich your payload. The preview section on the right hand-side shows an expected payload after the template is rendered. If the payload doesn't form a valid JSON, an error will be shown and it won't be possible to save the template.
Custom details in PagerDuty alerts are automatically populated.
Send a test notification
You can see how the PagerDuty incident will appear by clicking a test notification with default field values. If successful, an incident will be created and a link will appear.
Service integration
This integration requires to set up a New Relic PagerDuty integration in the service you would like New Relic to create incidents in. To create a New Relic integration in the PagerDuty service:
Go to Services > Service Directory and select the service where you'd like to add the integration.
Select the Integrations tab and click Add an integration.
Find and mark the New Relic integration in the list and click Add.
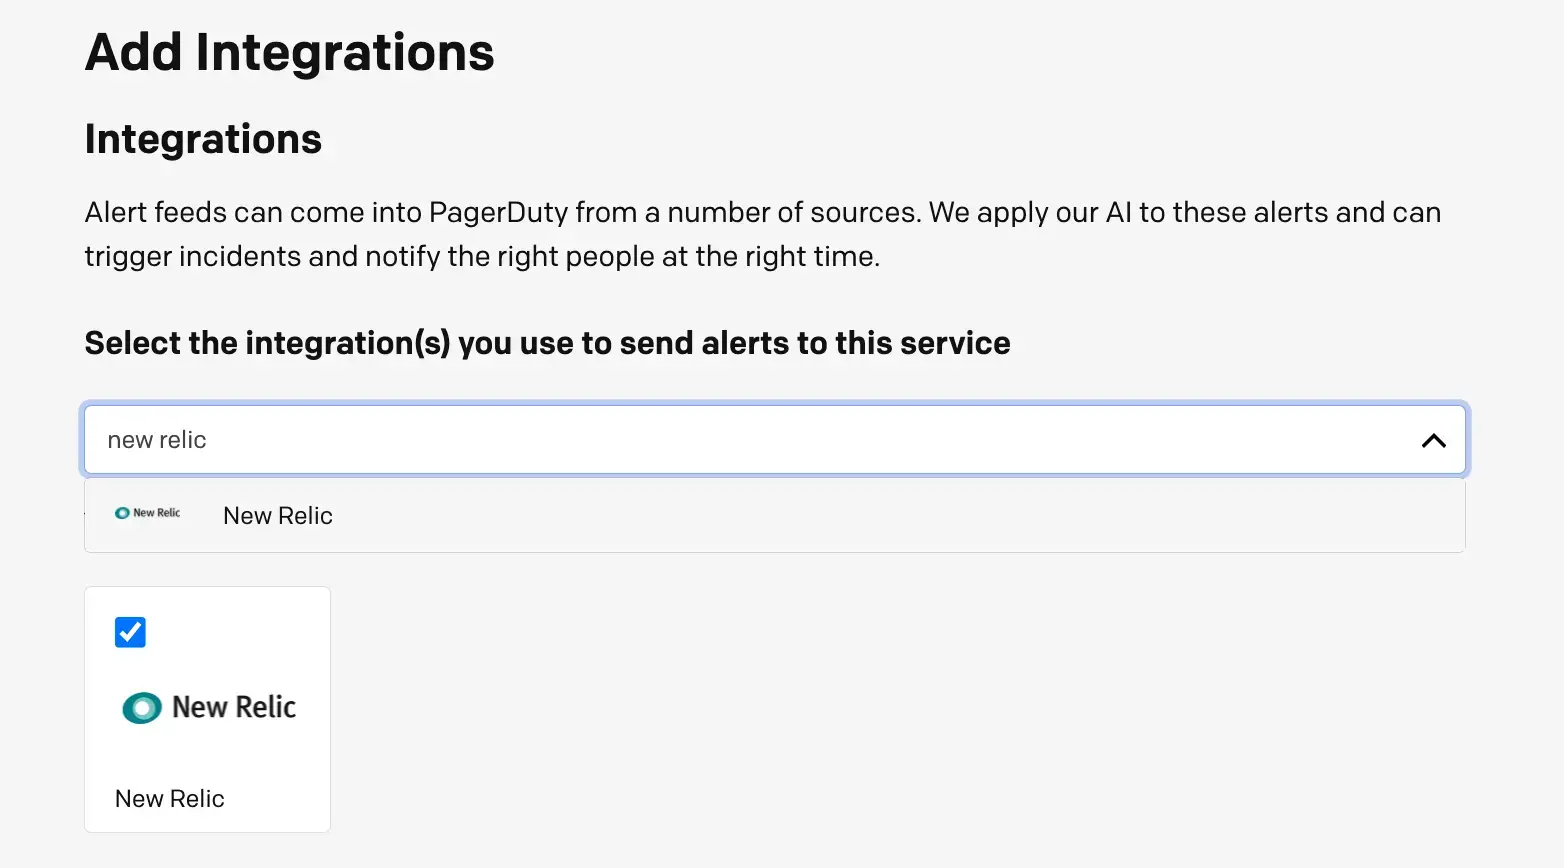
Click on the right to view and copy your Integration Key.

Configure the message template
To configure the message template:
Go to one.newrelic.com > All capabilities > Alerts > Workflows and click on an existing workflow, or click the + Add a new workflow button and choose the PagerDuty notifier.
Choose a destination, or create a new one.
(Optional) Edit the default incident summary.
Note that custom details in PagerDuty Alerts is automatically populated.
Send a test notification
You can see how the PagerDuty incident will appear by clicking a test notification with default field values.
重要
This is a legacy integration type that is in maintenance mode. If you've not yet set up this legacy integration, please see ServiceNow (Certified application).
Integrate New Relic with ServiceNow ITSM and automatically create, update, and resolve ServiceNow incidents.
Roles
As part of the integrations, we fetch fields from the your ServiceNow incident table, and other optional values. We require the following permissions:
Full read permissions for the tables
sys_dictionary,sys_choice,sys_user, andtask.Read/write permission to
incident.To fetch users for the
callercolumn, we need read permissions for thesys_usertable.The out-of-the-box non-granular roles
personalize_choices,personalize_dictionary,rest_serviceorsnc_platform_rest_api_access, anditilhave the above permissions. Read/write permissions to theapi_key_credentialstable are required to enable two-way integration. The rolescredentials_adminanddiscovery_adminprovide these.Set up a destination
To create a ServiceNow destination:
Go to one.newrelic.com > All capabilities > Alerts, click Destinations, and then select ServiceNow.
Enter the following information:
Destination Name: Custom name to identify the destination.
Domain: The URL of the destination.
Username: The name of the user.
Password: The user's password.
Before saving the destination, we recommend testing the connection by clicking the Test connection button.
Two-way sync
To configure the two-way integration:
Turn on the
two-way integrationtoggle.Open and download this XML file, which includes the business rule triggering events back to New Relic.
In the ServiceNow sidebar menu, go to System Definition > Business Rules.
Click the menu icon in one of the column headers, select Import XML, and upload the XML file you downloaded.
Once you save the destination, a New Relic API key is kept in
api_key_credentials. The key is sent in a header as part of the REST callback call to New Relic.Sync with workflows
- When the ServiceNow incident state changes to resolved triggers the closure of New Relic issue.
- When the ServiceNow incident state changes from open triggers the acknowledgment of New Relic issue.
Configure the message template in workflows
Go to one.newrelic.com > All capabilities > Alerts > Workflows and click on an existing workflow, or the + Add a new workflow button
Choose a ServiceNow destination.
Upon a successful connection, ServiceNow incident table columns are fetched from your account and automatically mapped to your ServiceNow instance.
To help you get started, the required and recommended fields are pre-populated with default values. When you add a custom value for a supported field, you can add a dynamic value from the issue payload or write your own value. You can remove any non-required field and add your own.
Send a test notification
Click Send test notification to see ServiceNow incidents with default field values. If successful, you'll see a link with the created incident.
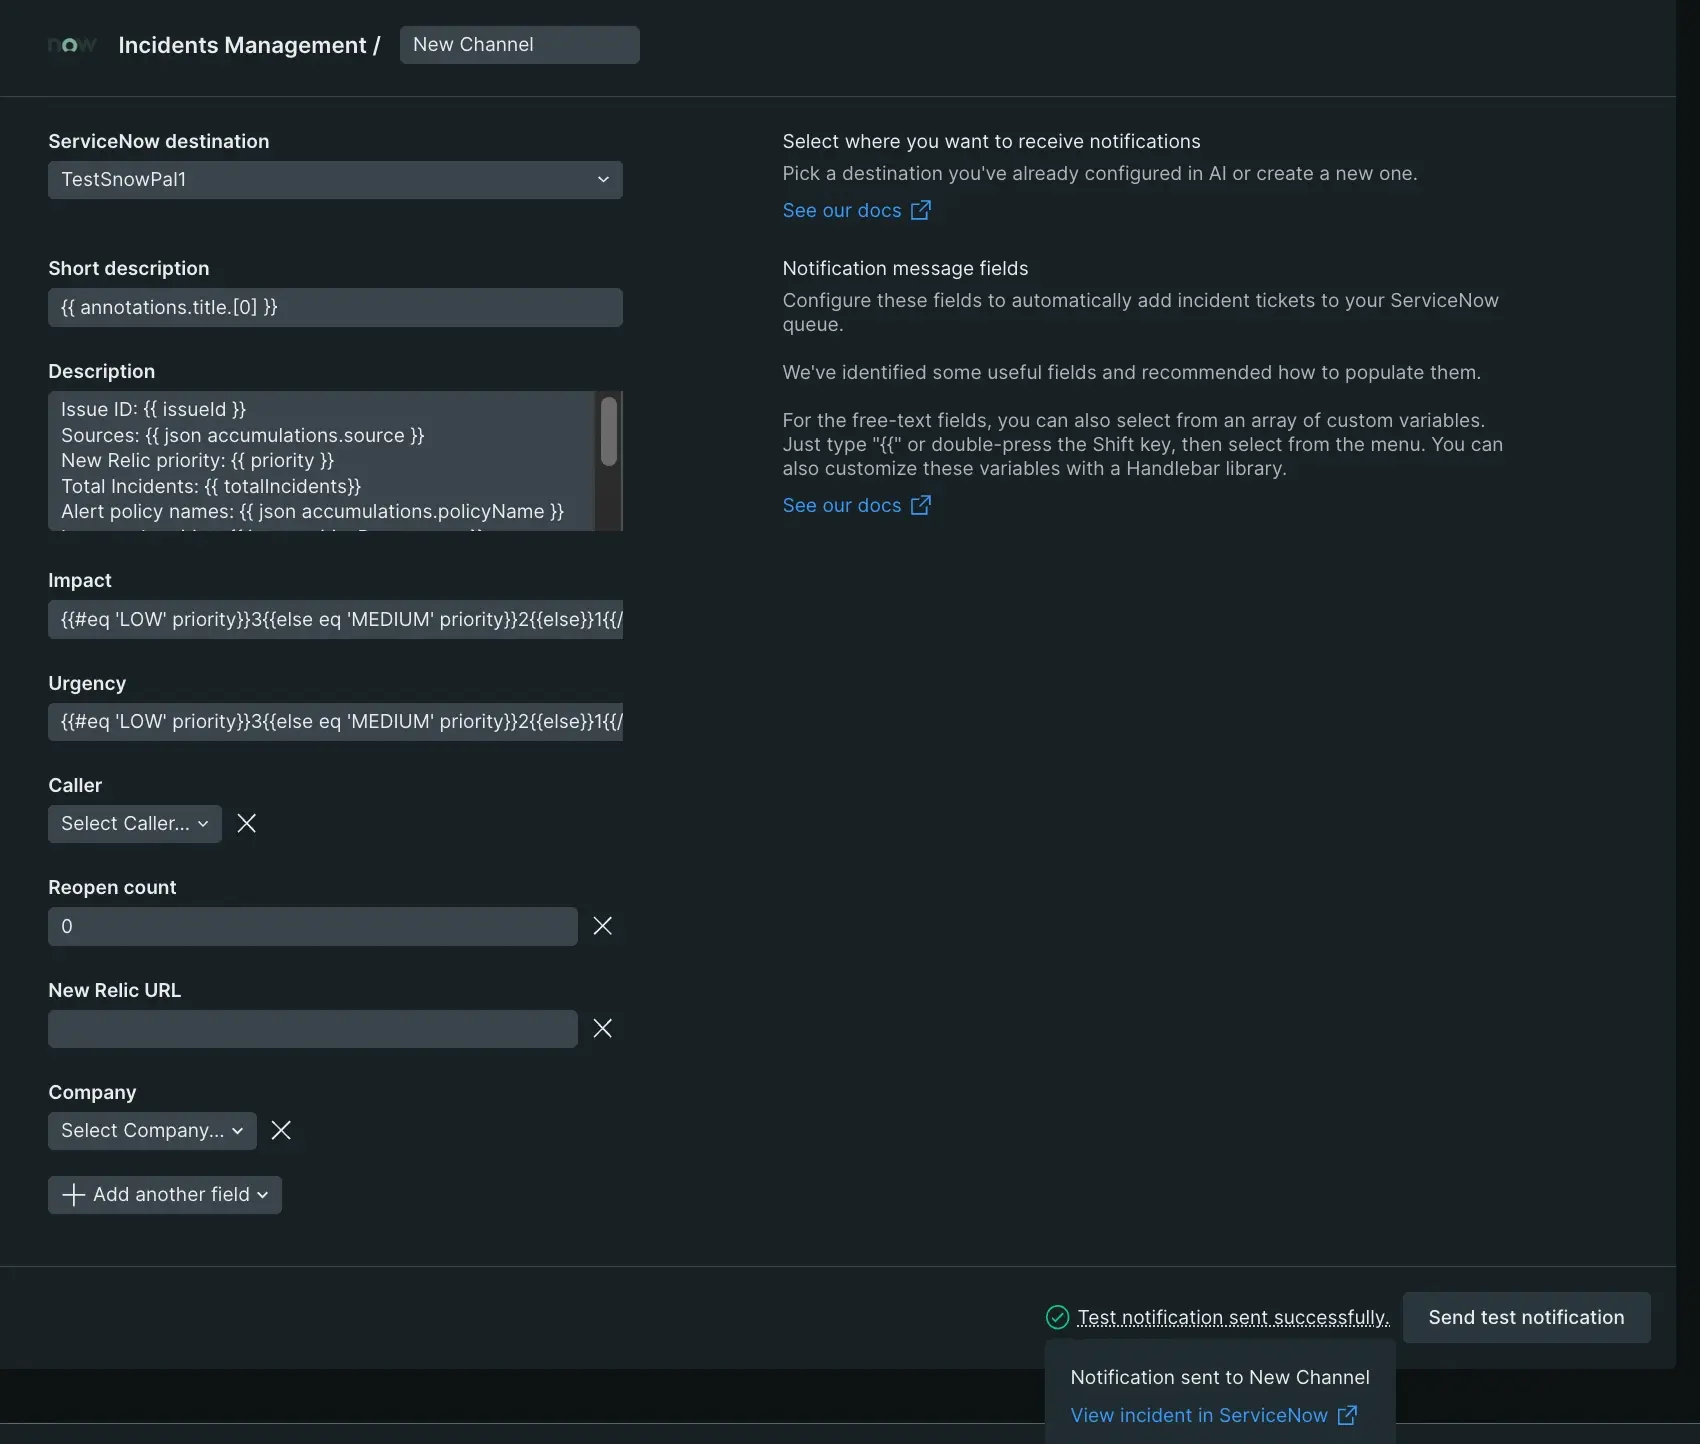
Select, edit, or remove fields for the ServiceNow-Incident template.
The certified ServiceNow integration with New Relic workflows is available in the ServiceNow store. When using ServiceNow, remember the following:
The ServiceNow instance stores the New Relic issue notifications as
New Relic Issues.You can configure routing policies in ServiceNow to generate tasks or other records to represent or correspond to those issues when they match a given policy.
The acknowledgment or closure events in ServiceNow can acknowledge or close the issue in New Relic.
You can automatically convert New Relic issues to actionable tasks in ServiceNow.
ServiceNow can receive updates from New Relic on issues.
The policy engine allows the qualification of New Relic as they come in.
Match entities to configuration items and relate them to the task table available.
From ServiceNow you can send and see as images the New Relic enrichments.
You can integrate ServiceNow with New Relic by either using the ServiceNow application destination or using the webhook destination. Please refer to this installation guidefor more details, tips, and best practices.
Destination type
ServiceNow Application destination
Webhook destination
Payload
Controlled by New Relic. No notification template. Limited modification of SNOW attributes via tags.
Payload directly editable in the notification template.
Ability to update New Relic from ServiceNow
Included. A New Relic connection is automatically created when the destination is created.
Included. You need to create the New Relic connection manually.
Routing policies
Included
Included
Ability to update the target fields directly
Yes, using the tags on entities along with the default New Relic Flow designer.
Yes, using the tags on entities and specifying in the webhook payload along with the default New Relic Flow designer.
Set up the ServiceNow application destination
重要
If you don't have access to create a new destination, send an email to notificationWorkflows@newrelic.com with your account name and account number for assistance.
To create a ServiceNow destination, follow these steps:
Download and install the New Relic application in the ServiceNow store.
Create a user inside ServiceNow. Make sure you enable the Web service access only option and grant the
x_newre_core.inbound_apirole to the created user. Copy and save the generated password.Go to one.newrelic.com > All capabilities > Alerts, click Destinations, and then select ServiceNow.
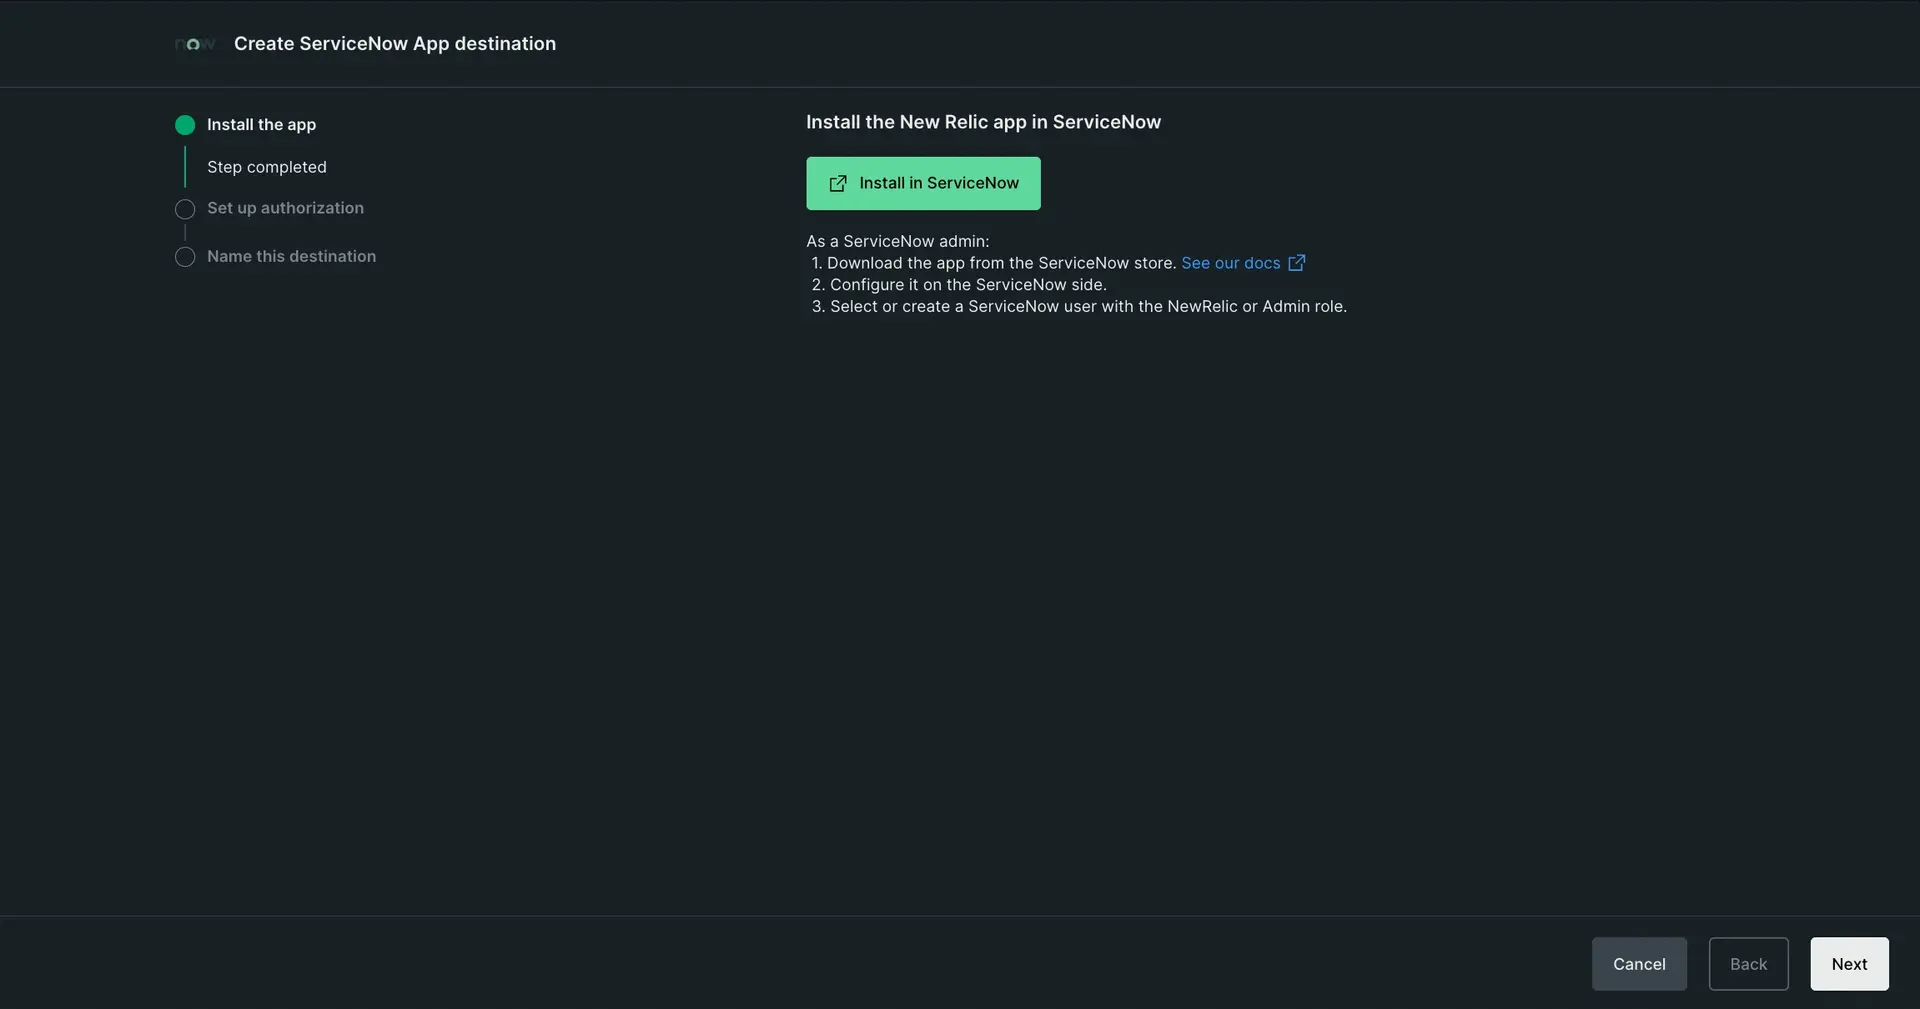
Click Next.
Add the domain, username, and password. The domain should include
*.service-now.com. Add the password you copied in step 2.Click Next.
Name the destination.
Click Save destination.
Use this destination with your notification workflows.
ヒント
You can update ServiceNow attributes directly in the target table, such as Incident directly from New Relic. To do this, tag related entities such as alert conditions, APM entities, synthetics, hosts, etc., with
serviceNowFields.[serviceNow_value]orserviceNowFields.dv_[serviceNow_name]. For example, to populate your APM entity as a configuration item in the incident table, tag it withserviceNowFields.dv_configuration_item : my_ci.Set up the webhook destination
To create a webhook destination, follow these steps:
Download and install the New Relic application in the ServiceNow store.
Create a user inside ServiceNow. Make sure you enable the Web service access only option and grant the
x_newre_core.inbound_apirole to the created user. Copy and save the generated password.Go to one.newrelic.com > All capabilities > Alerts, click Destinations, and then select Webhook.
Fill in the following fields:
Webhook name: A name to identify the webhook.
Endpoint URL: The endpoint URL of the destination. It should include
*.service-now.com/api/x_newre_core/new_relic/issue/notification, for example,https://my_instance.service-now.com/api/x_newre_core/new_relic/issue/notification.Use authorization: Enable the Basic authorization option and enter the username and the copied password to authenticate ServiceNow.
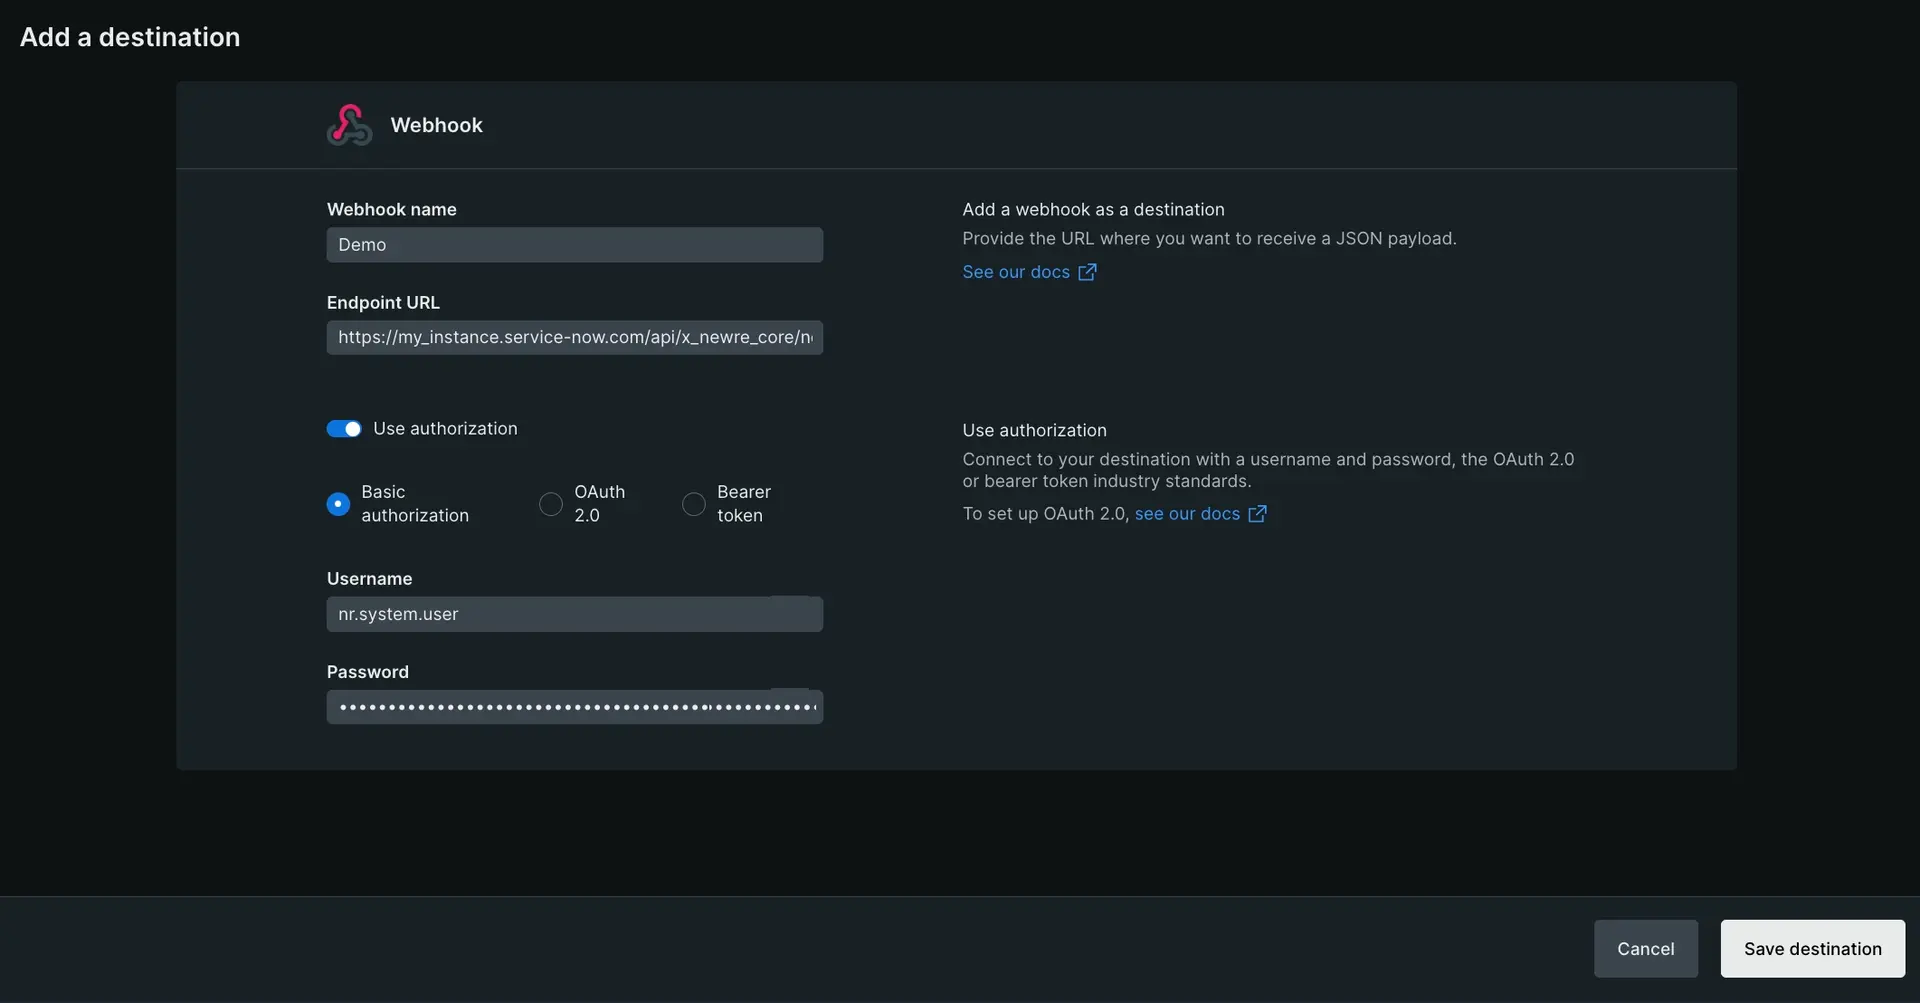
Click Save destination.
You can see the short video below that shows how to create a Webhook destination:
To add the
serviceNowFieldsin a Webhook payload:Go to one.newrelic.com > All capabilities > Alerts, click Workflows.
Click the icon on an existing Webhook and select Edit, or click the + Add a new workflow button.
Click the Webhook channel.
Modify the default payload by adding the
serviceNowFieldsattributes you need to.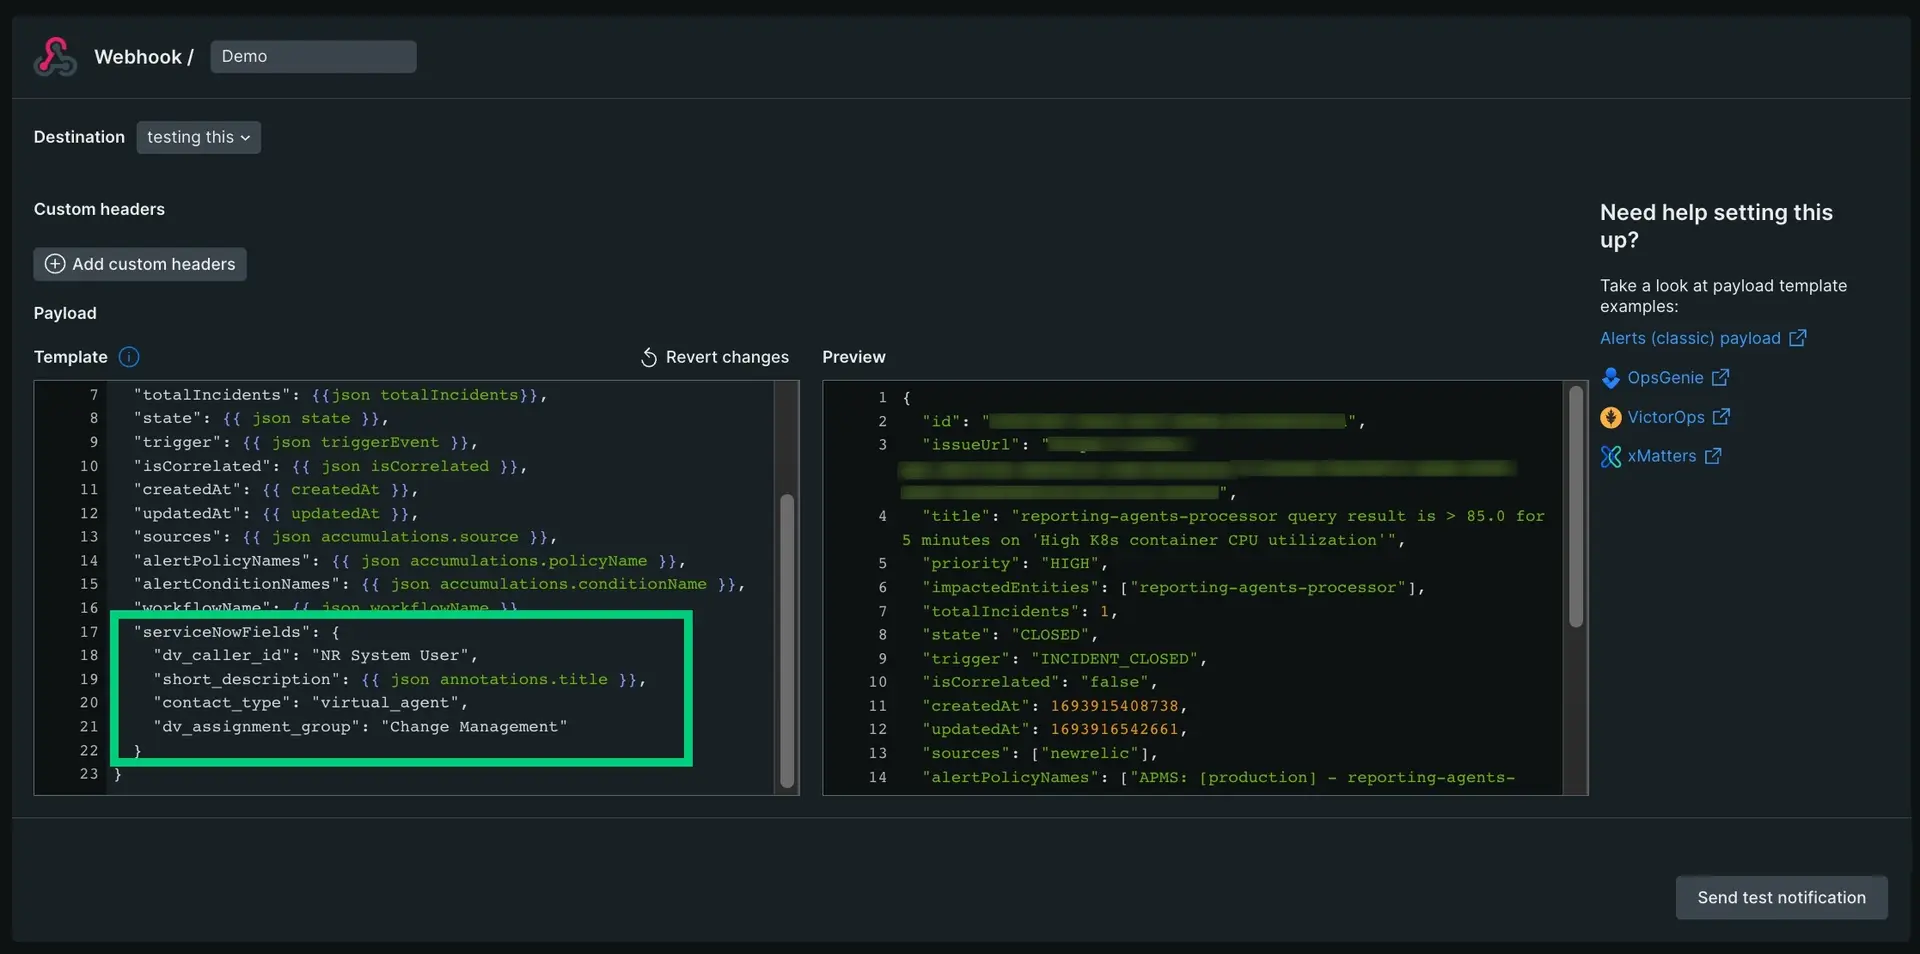
Click Send test notification to check your changes.
Click Save message.
Click Activate workflow.
Send notification messages to your Slack channels. See how to migrate from your old Slack webhook destination to the new Slack app for more information.
Prerequisites
Your Slack workspace needs to have the New Relic application(or the EU App for one.eu.newrelic customers) installed. A workspace administrator must approve the application before you can individually install it.
Click the Authenticate in one click button to go to the Slack landing page, and continue the OAuth2 authentication process. If you're not signed into the required workspace, you're redirected to Slack to sign in.
Enter your workspace name or select the relevant workspace, and click Continue.
Click Allow, and return to the destination page.
重要
Each Slack workspace has a unique destination for each New Relic account.
Configure the Slack message template in workflows
ヒント
For privacy reasons, users need to be authenticated before they can select private channels. After you select a private channel, the bot will automatically be added to the channel.
Go to one.newrelic.com > All capabilities > Alerts > Workflows and click on an existing workflow, or the + Add a workflow button.
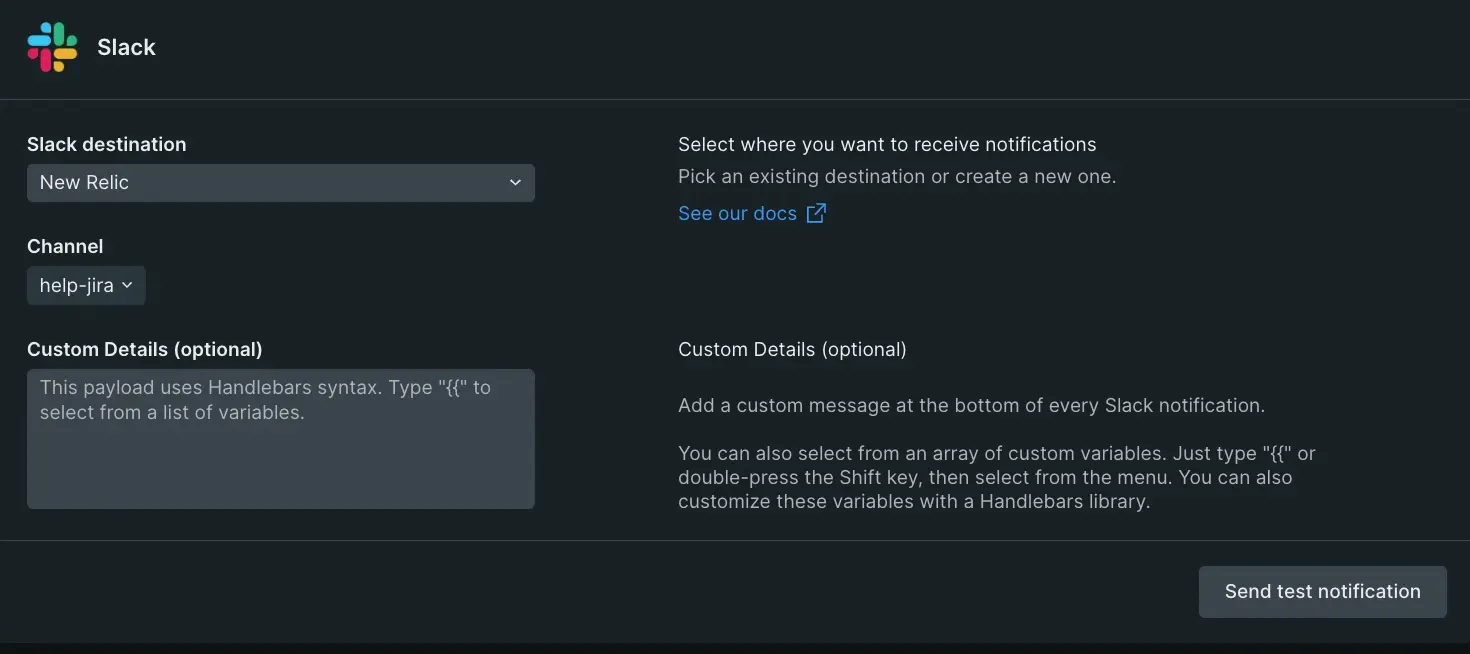
Select a destination, also known as a workspace, and a Slack channel to send messages. You can create a new destination if there is no pre-defined destination for the required workspace.
You can choose to receive notification updates, like when an issue is acknowledged or closed, on the channel as well. This is also known as the thread broadcast.
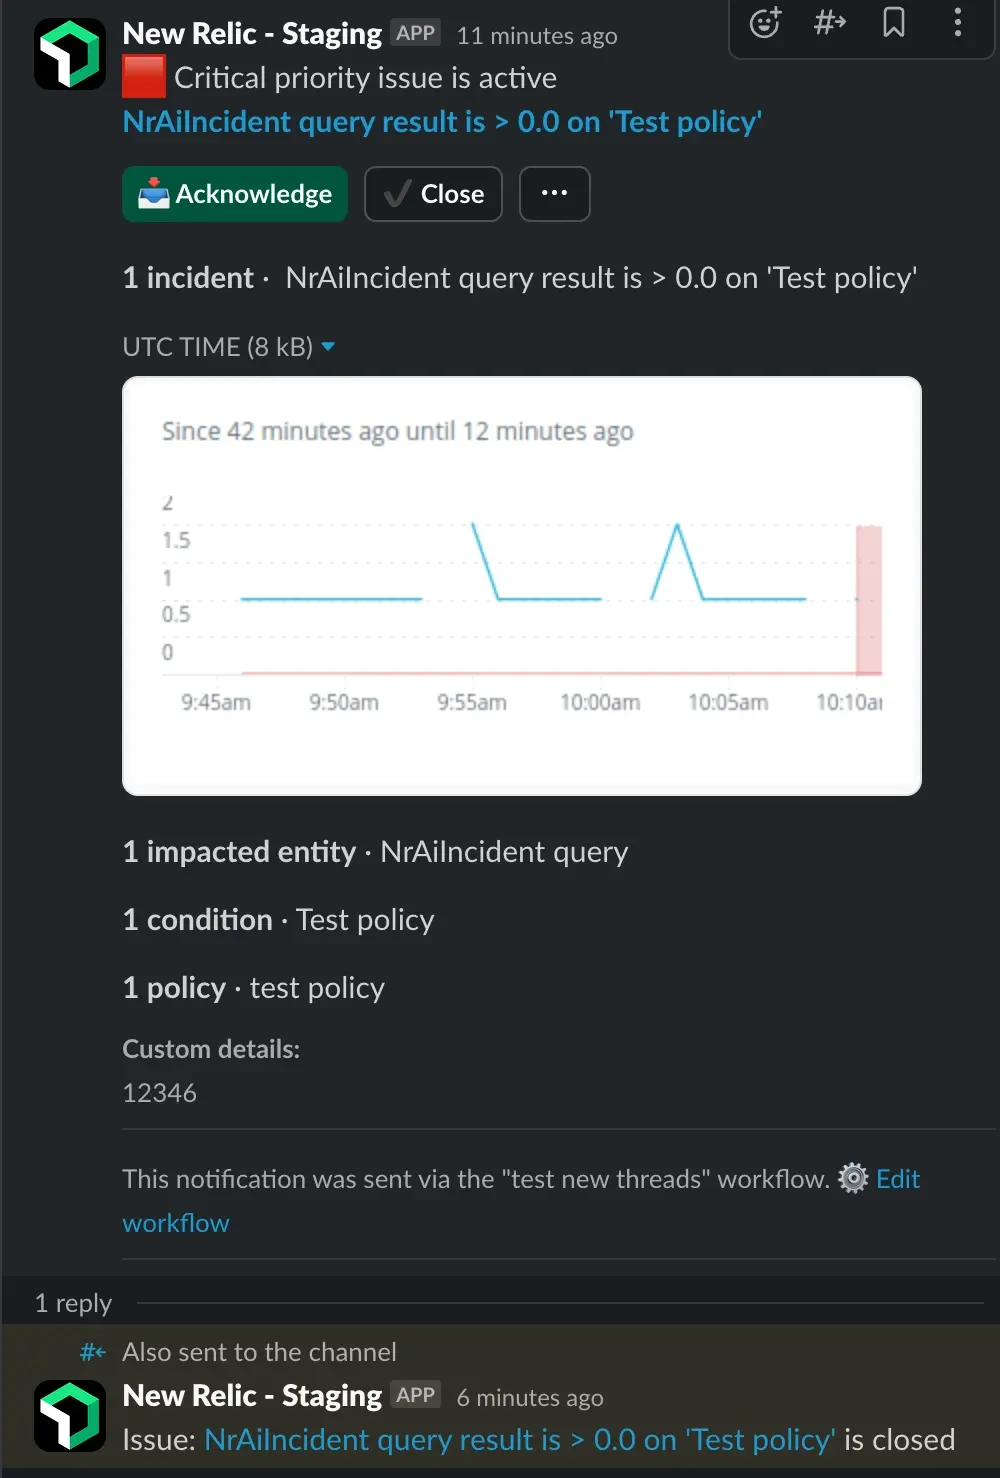
You can use the default notification or enrich it with custom details. Pick variables from the variables menu and apply handlebars syntax to enrich your payload.
Click the Send test notification button to send a test notification with a pre-defined example payload to the channel. This creates a message in the selected Slack channel.
Webhook template for Splunk On-call
Send notifications from workflows to Splunk On-call using a webhook template
You should use a webhook notifier in workflows to send notification messages to a specified HTTPS endpoint. By default, the notifier assumes that the content type of the request is JSON and makes an HTTP POST request to the given endpoint. When you start configuring it, the webhook notifier provides a default JSON payload structure that you can use out of the box. However, if you require more customization, you can modify the payload using Handlebars template syntax. This allows you to populate variables within the payload dynamically, tailoring it to your specific needs.
In addition to the payload, you also have the ability to include additional HTTP headers in the webhook request. This can be useful for passing extra information or authentication tokens to the receiving endpoint. Here is a video tutorial for setting up webhooks.
Set up a webhook destination
To create a webhook destination follow these steps:
Go to one.newrelic.com > All capabilities > Alerts, click Destinations, and then select Webhook.
Enter the following information:
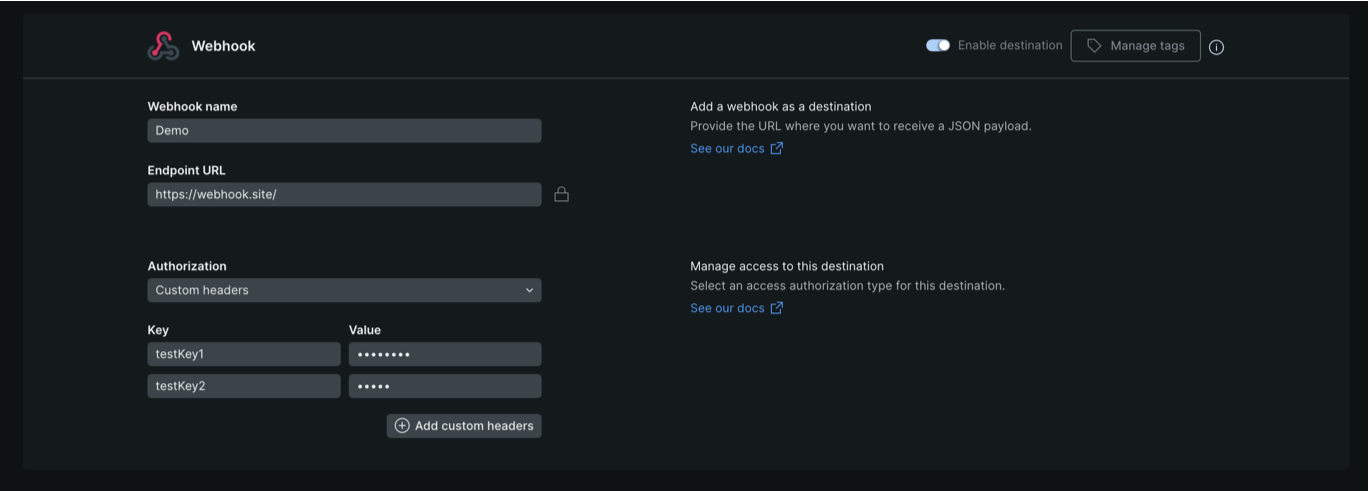
- Webhook name: Reference name for your webhook.
- Endpoint URL: The endpoint of the target application where an HTTP POST request will be sent.
- Use authorization: (Optional) You can choose between
Basic AuthenticationorBearer Token.
If you're new to working with webhooks and want to test the configuration and examine webhook payloads without writing a service, you can use HTTP catch-all services. Beeceptor and Webhook.site are examples of services that give you a designated URL where you can receive HTTP payloads and then inspect the JSON payload of the event. This feature is valuable for gathering relevant information before starting your development process.
If you're building a new service to consume this payload you must test it locally. Using local tunnels is a good idea for testing and debugging webhooks in a local environment before deploying to a production server. These tunnels allow you to receive incoming webhook requests from New Relic on your local machine, eliminating the need for a publicly accessible server during development. Tools like Beeceptor or ngrok enable you to create a temporary public URL that forwards requests to your local server by specifying the desired application port or address. This expedites iteration and debugging, as you can directly observe and analyze webhook payloads in your local development environment.
Two-way sync
For notifications sent from workflows, you can acknowledge or close issues using Nerdgraph. When testing two-way sync with webhooks, you can use Beeceptor's customized response status and payload templates. This allows you to draft a desired response when acknowledging the received events.
Secure URL
You can add sensitive information in the URL’s path and parameters, such as service ID or API keys. To avoid having these secrets exposed, we've added an option that encrypts sensitive information past the domain from both users and internal metrics collection alike.
The service only uses the full URL when when it sends notifications. Once the secure URL has been saved, however, you need to manually update the URL so it completely overrides the saved URL.

Custom Headers Authentication
Some users may pass sensitive information in their headers, such as API keys and personal IDs. To secure sensitive information from exposure, you can create custom headers that encrypt values and mask data from users and internal logs. Keep in mind that:
If the values for encrypted information changes, you'll need to completely delete and rewrite the value.
If you added same header key to both the destination and the channel, the destination will take precedence. The channel won’t be used.
Configure the webhook event template
Pick a webhook destination from the list, and configure the
HTTP-POSTrequest.The request configuration requires you to:
Set a name for the template.
Select a pre-configured destination from the destinations list or create a new one.
Add custom headers (optional).
Configure the request's payload.
Customize the webhook payload in workflows
Go to one.newrelic.com > All capabilities > Alerts > Workflows and click on an existing workflow, or the + Add a new workflow button and select a Webhook destination.
重要
The request's content-type is JSON by default, so the payload needs to be in JSON format too. To get familiar with the format, see our usage examples.
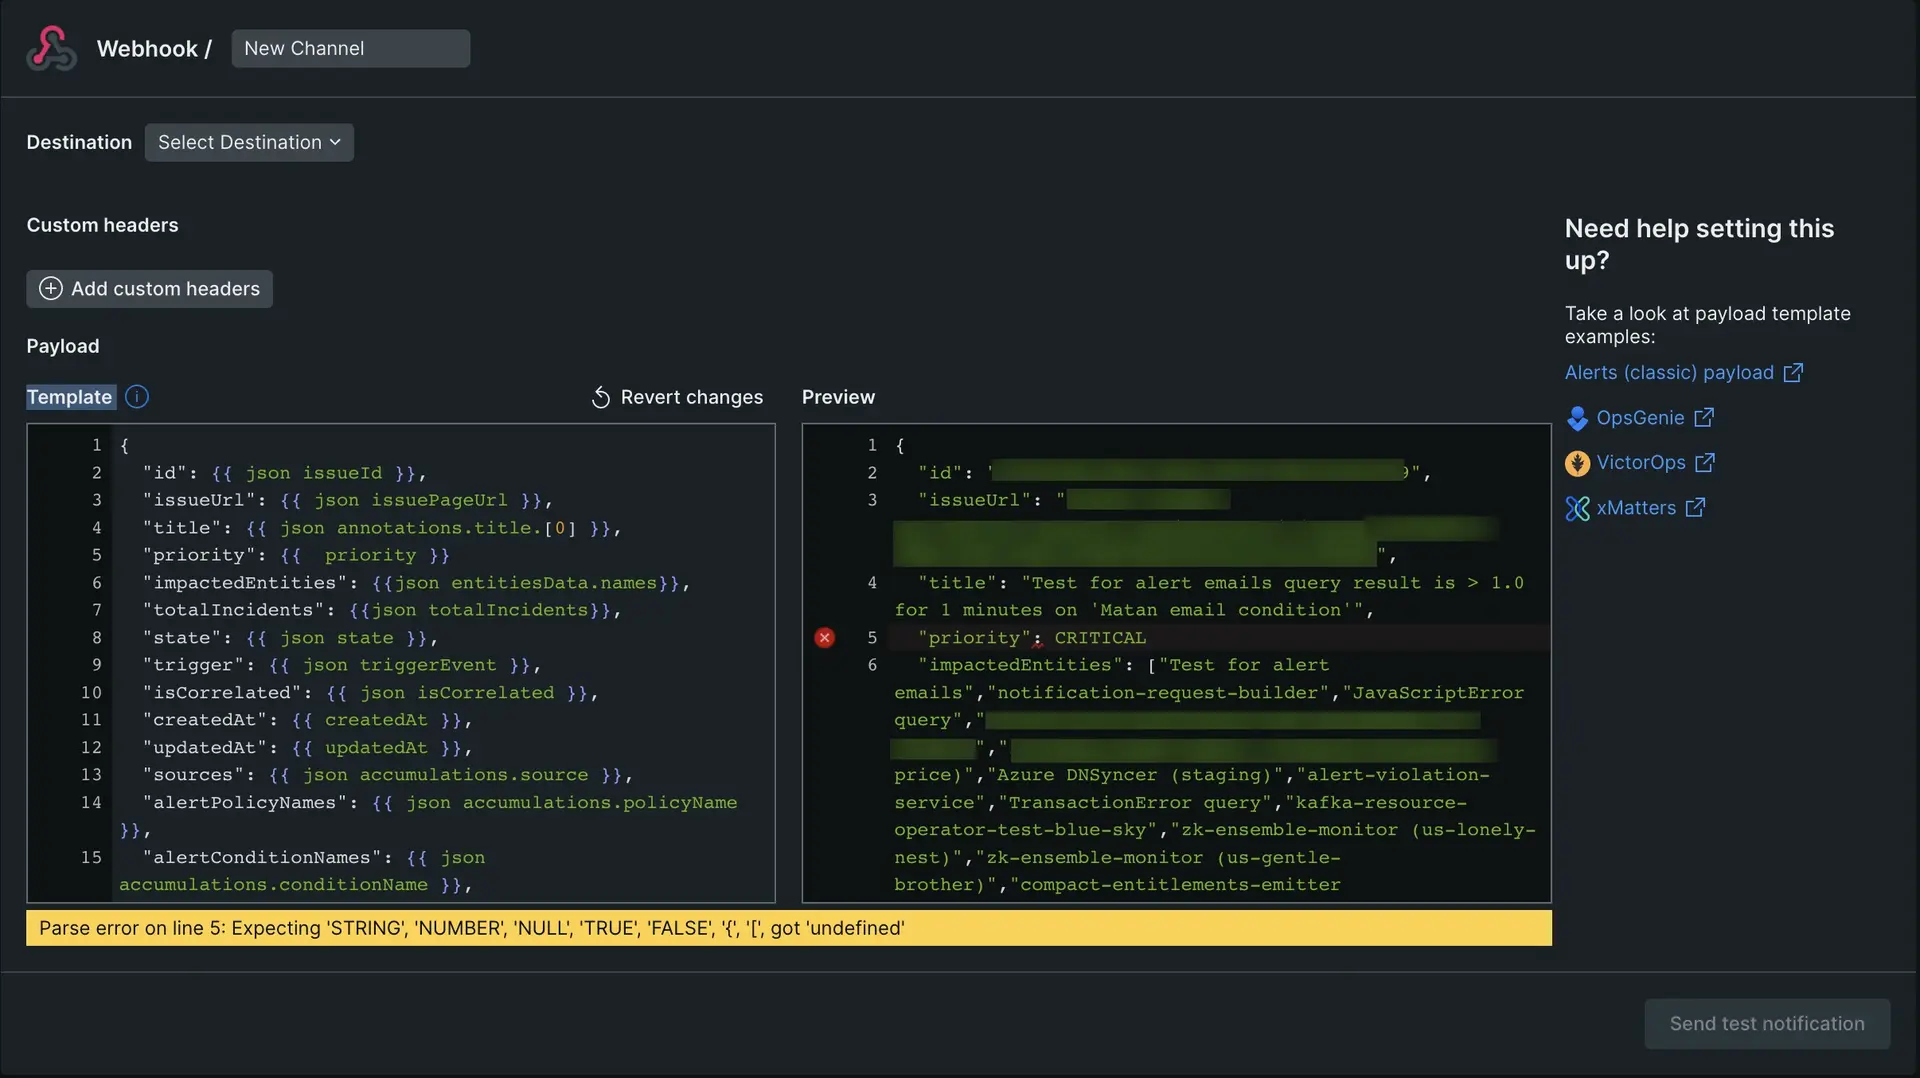
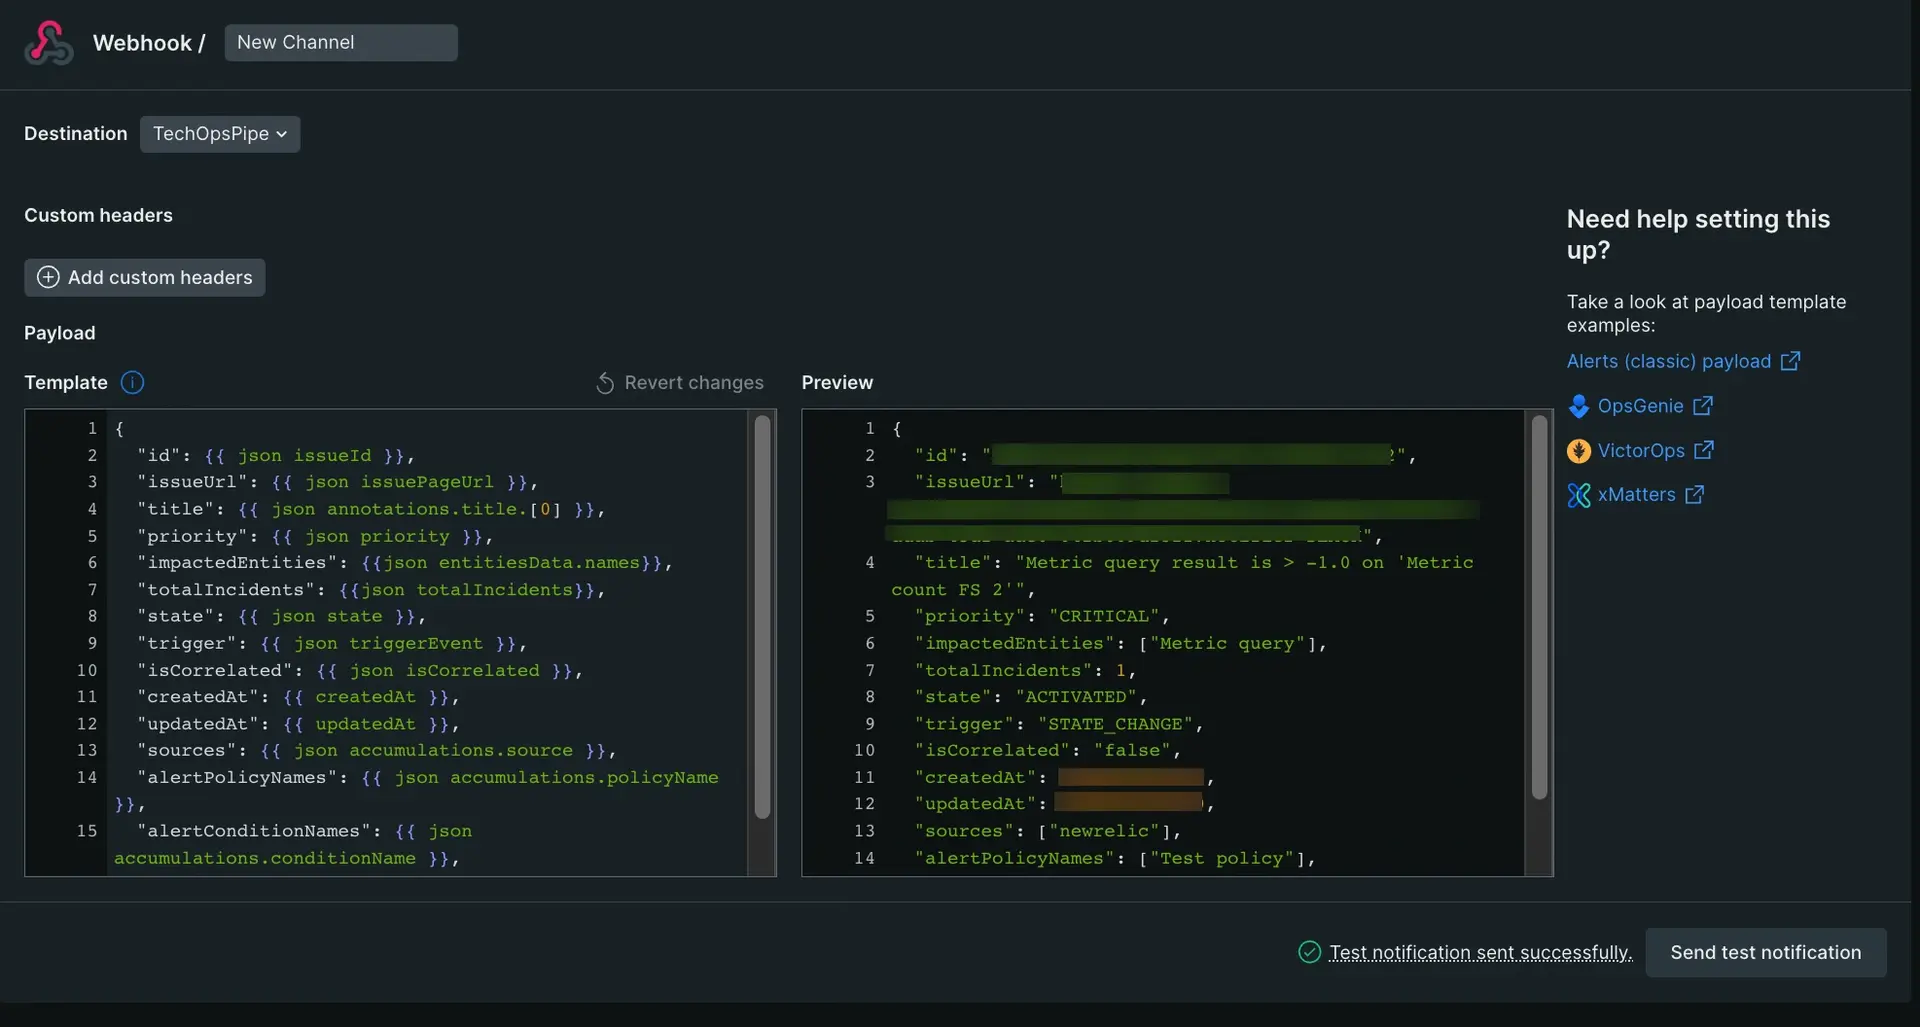
You can use the default payload or customize it to contain the required data. Pick variables from the variables menu and apply handlebars syntax to enrich your webhook. The Preview section on the right hand-side shows an expected payload after the template is rendered. If the payload doesn't form a valid JSON, there'll be an error and you couldn't save the template.
ヒント
Undefined type errors may indicate that the attribute wasn't indexed recently or doesn't exist. To fix the error, try adding an
if elsestatement. For example,"closed_at": {{#if issueClosedAtUtc}} {{ json issueClosedAtUtc }} {{else}}"None"{{/if}}If the webhook payload conforms to a valid JSON, you can send a test notification to your defined webhook destination. We recommend sending a test notification to make sure that everything's connected correctly.
Webhook template for xMatters
Send notifications from workflows to xMatters using a webhook template.
{ {{#if nrAccountId}}"account_id": {{nrAccountId}},{{/if}} "account_name": {{json accumulations.tag.account.[0]}}, {{#if accumulations.tag.action}}"action":{{json accumulations.tag.action.[0]}},{{/if}} "closed_violations_count": { "critical": {{#if closedIncidentsCount}}{{closedIncidentsCount}}{{else}}0{{/if}}, "warning": 0, "total": {{#if closedIncidentsCount}}{{closedIncidentsCount}}{{else}}0{{/if}} }, "condition_family_id": {{accumulations.conditionFamilyId.[0]}}, "condition_id": {{accumulations.conditionFamilyId.[0]}}, "condition_name": {{json accumulations.conditionName.[0]}}, {{#if accumulations.evaluationName}}"condition_metric_name": {{json accumulations.evaluationName.[0]}},{{/if}} {{#if accumulations.evaluationMetricValueFunction}}"condition_metric_value_function": {{json accumulations.evaluationMetricValueFunction.[0]}},{{/if}} "current_state": {{#if issueClosedAt}}"closed"{{else if issueAcknowledgedAt}}"acknowledged"{{else}}"open"{{/if}}, "details": {{json issueTitle}}, "duration": {{#if issueDurationMs}}{{issueDurationMs}}{{else}}0{{/if}}, "event_type": "INCIDENT", "incident_acknowledge_url": {{json issueAckUrl}}, "incident_url": {{json issuePageUrl}}, "incident_id": {{json issueId}}, "metadata": { {{#if locationStatusesObject}}"location_statuses": {{locationStatusesObject}},{{/if}} {{#if accumulations.metadata_entity_type}}"entity.type": {{json accumulations.metadata_entity_type.[0]}},{{/if}} {{#if accumulations.metadata_entity_name}}"entity.name": {{json accumulations.metadata_entity_name.[0]}}{{/if}} }, "open_violations_count": { "critical": {{#if openIncidentsCount}}{{openIncidentsCount}}{{else}}0{{/if}}, "warning": 0, "total": {{#if openIncidentsCount}}{{openIncidentsCount}}{{else}}0{{/if}} }, "policy_name": {{json accumulations.policyName.[0]}}, {{#if policyUrl}}"policy_url": {{json policyUrl}},{{/if}} "radar_entity": { "accountId": {{json accumulations.tag.accountId.[0]}}, "domain": {{json accumulations.conditionProduct.[0]}}, "domainId": {{json issueId}}, "entityGuid": {{json entitiesData.entities.[0].id}}, "name": {{#if accumulations.targetName}}{{json accumulations.targetName.[0]}}{{else if entitiesData.entities}}{{json entitiesData.entities.[0].name}}{{else}}"NA"{{/if}}, "type": {{#if entitiesData.types.[0]}}{{json entitiesData.types.[0]}}{{else}}"NA"{{/if}} }, {{#if accumulations.runbookUrl}}"runbook_url": {{json accumulations.runbookUrl.[0]}},{{/if}} "severity": {{#eq HIGH priority}}"WARNING"{{else}}{{json priority}}{{/eq}}, "state": {{json state}}, "status": {{json status}}, "targets": [ { "id": {{#if entitiesData.entities.[0].id}}{{json entitiesData.entities.[0].id}}{{else if accumulations.nrqlEventType}}{{json accumulations.nrqlEventType.[0]}}{{else}}"N/A"{{/if}}, "name": {{#if accumulations.targetName}}{{json accumulations.targetName.[0]}}{{else if entitiesData.entities}}{{json entitiesData.entities.[0].name}}{{else}}"NA"{{/if}}, "link": {{json issuePageUrl}}, "product": {{json accumulations.conditionProduct.[0]}}, "type": {{#if entitiesData.types.[0]}}{{json entitiesData.types.[0]}}{{else}}"NA"{{/if}}, "labels": { {{#each accumulations.rawTag}}{{#if this.[0]}}"{{@key}}":{{json this.[0]}},{{/if}}{{/each}} "NewRelic": "targetLabels" } } ], "timestamp": {{#if closedAt}}{{closedAt}}{{else if acknowledgedAt}}{{acknowledgedAt}}{{else}}{{createdAt}}{{/if}}, "timestamp_utc_string": {{json issueUpdatedAt}}, "version": "1.0", {{#if accumulations.conditionDescription}}"VIOLATION DESCRIPTION": {{json accumulations.conditionDescription.[0]}},{{/if}} {{#if violationChartUrl}}"violation_chart_url": {{json violationChartUrl}},{{/if}} "violation_callback_url": {{json issuePageUrl}}}Migrate your legacy Slack destinations to the new Slack destination
To migrate your legacy Slack destinations to the new Slack destination follow these steps:
Set up a new Slack destination.
For each workflow that sends to the legacy Slack destination, do the following:
- Find the Slack channel that was sent with the legacy notification, and save it.

- Test the notification to see it works.
- Remove the existing legacy Slack notifier.

- Click Test workflow to confirm with a real issue matching the filter (if they exist).
- Save the workflow.
API options
You can also use our NerdGraph API to view and configure destinations and notification channels.