Once you've created your first fleet using the setup guide, you'll perform most of your day-to-day work from the Fleet Control UI. While these operations can also be performed programmatically via the API, this page focuses on the UI workflows for managing your fleets, deployments, and configurations.
Understanding fleet types
Fleet Control supports three types of fleets, each designed for a specific managed entity type:
- Kubernetes Cluster fleets: Manage Kubernetes clusters where agents are deployed as Helm charts.
- Linux Host fleets: Manage Linux servers where agents run as host-based processes.
- Windows Host fleets: Manage Windows servers where agents run as Windows services or host-based processes.
When you create a fleet, you select its managed entity type. This choice has important implications for how you work with that fleet:
- Entity assignment: You can only add managed entities that match the fleet's type. For example, a Windows Host fleet can only contain Windows hosts, and a Kubernetes Cluster fleet can only contain Kubernetes clusters.
- Configuration filtering: During deployment, you'll only be presented with configurations that match the fleet's type. If you're working with a Windows Host fleet, only Windows Host configurations will appear in the configuration selector. This automatic filtering prevents misconfigurations and streamlines the deployment process.
- Agent availability: The list of available agents to deploy will be filtered based on the fleet type and what's supported for that environment. For example, certain agents may only be available for Kubernetes environments or specific host operating systems.
This design ensures consistency across all managed entities in a fleet and prevents misconfigurations, such as accidentally trying to deploy a Kubernetes Helm chart configuration to a Windows host.
Sorting data in tables
Many of the data tables throughout the Fleet Control UI are sortable. To sort a table by a specific column, mouse over the column header. If a faint gray up or down arrow appears, you can click the header to reorder the table rows based on that column's data.
The Fleets page
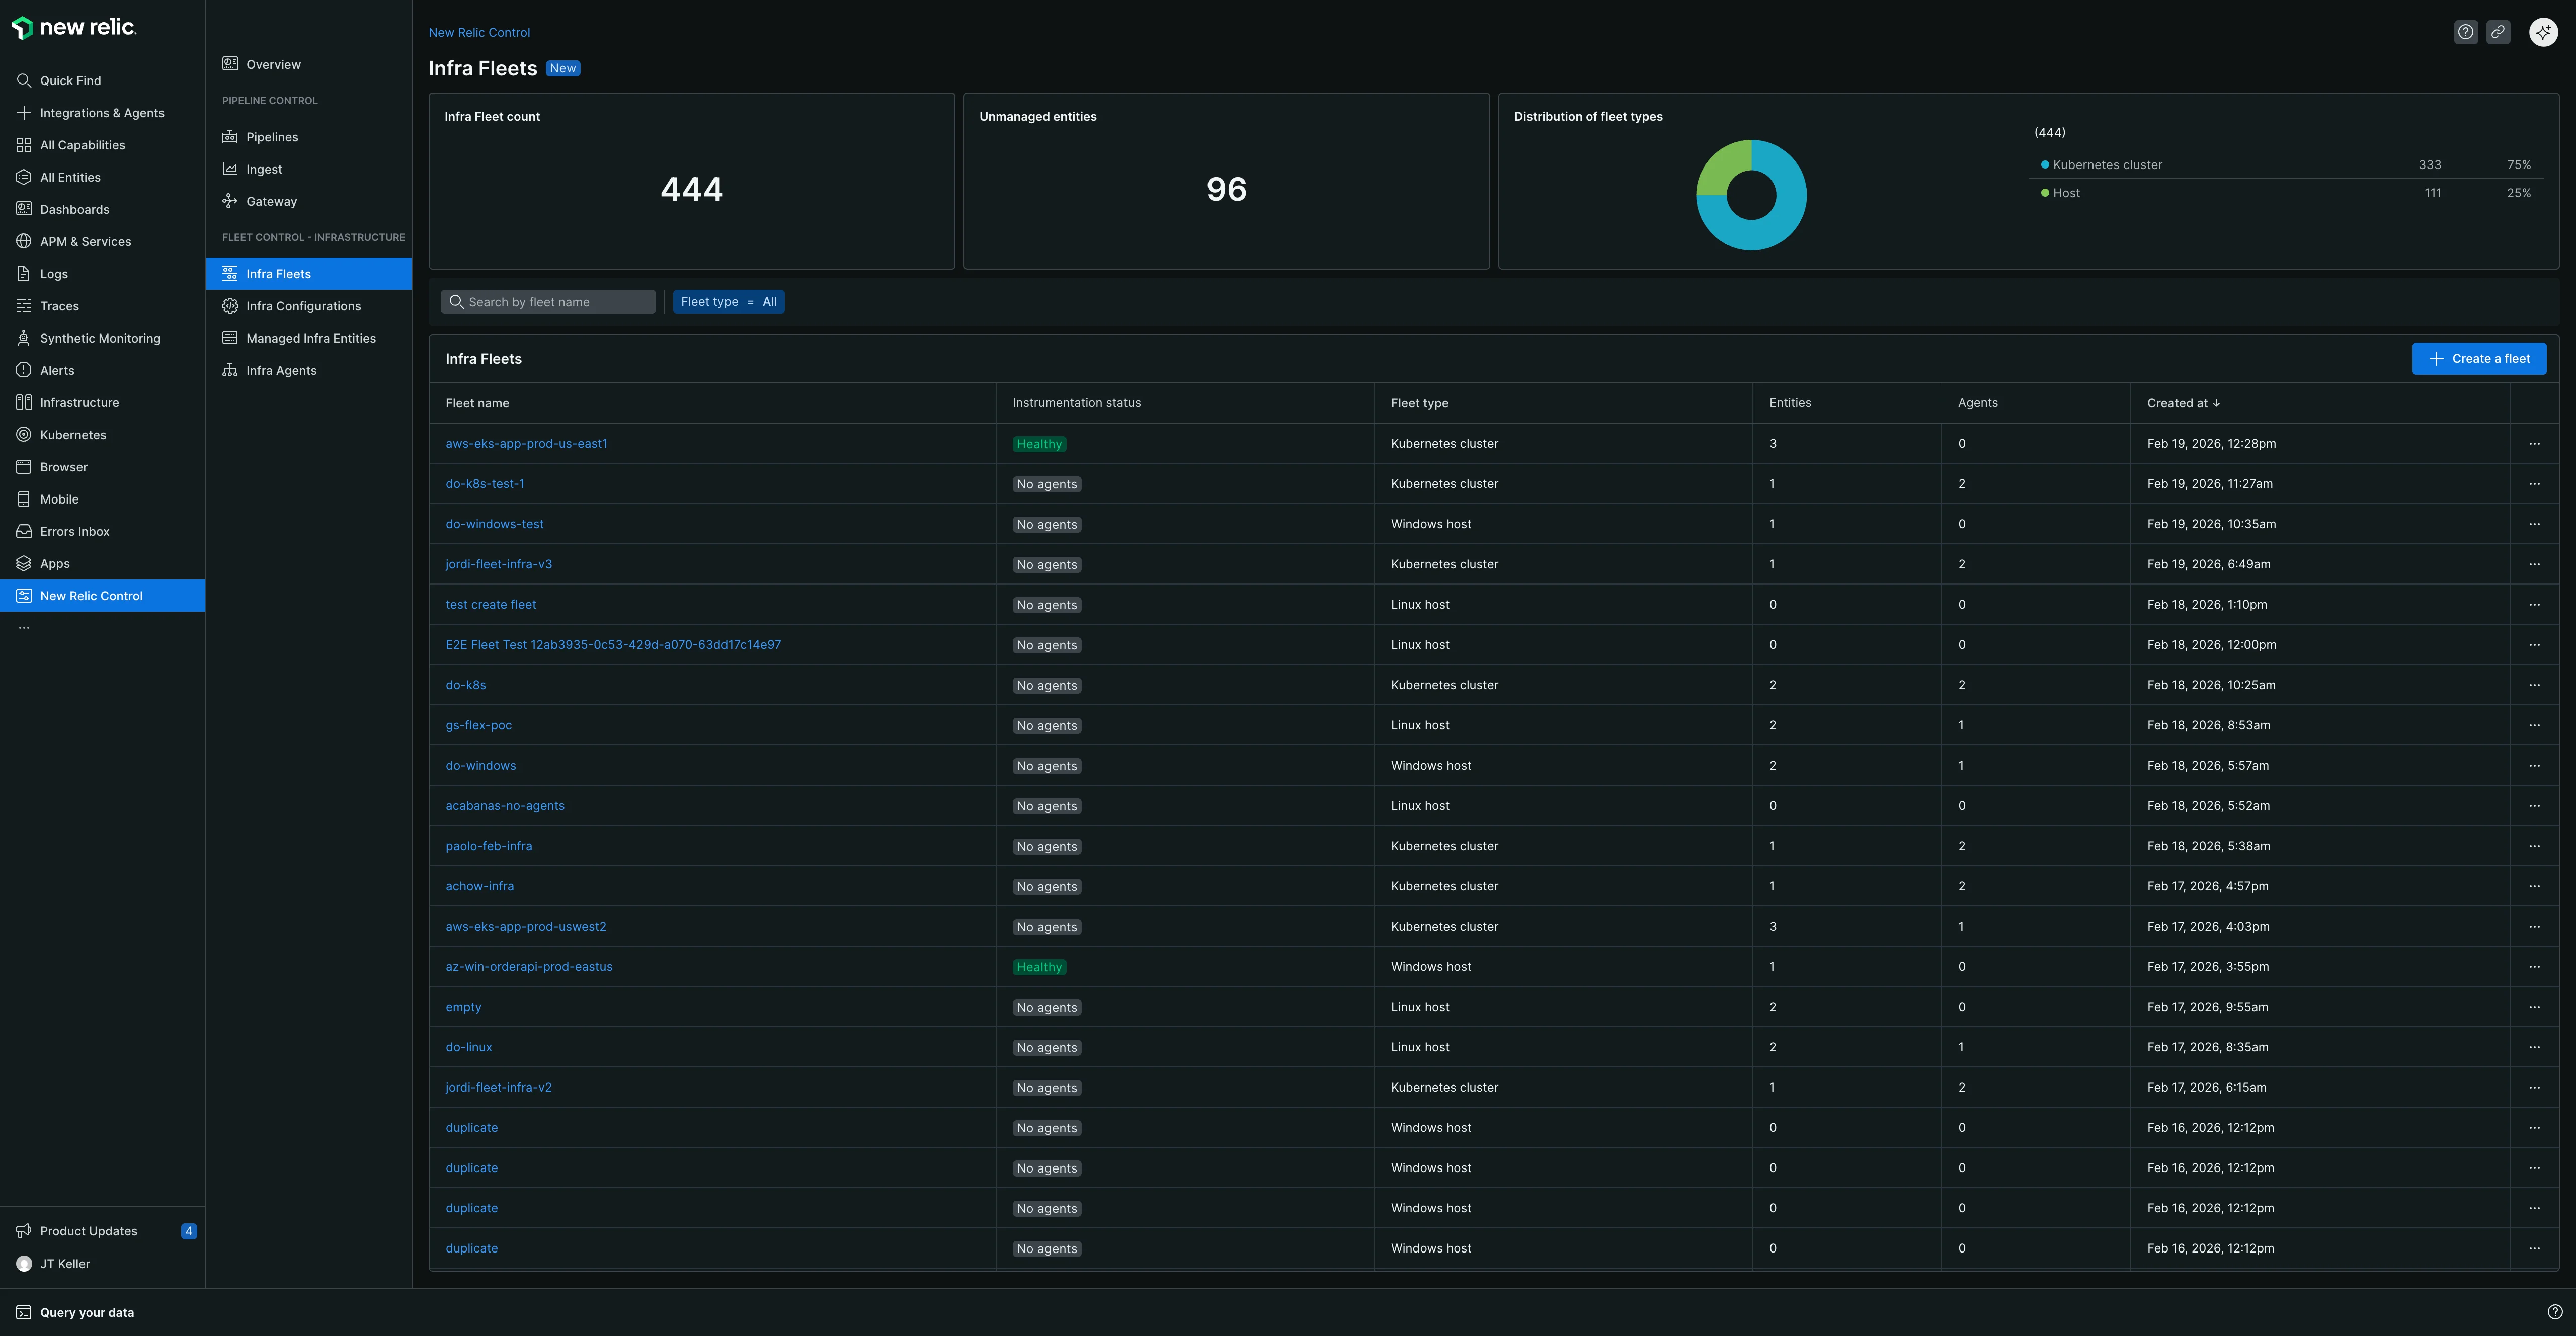
When you navigate to New Relic Control → Fleets, you land on the main Fleets page, which provides a high-level overview of your entire Fleet Control environment. From here, you can:
- Search for fleets: Use the search bar to find a specific fleet by name.
- View summary counts: See your total fleet count and the number of unassigned managed entities.
- See fleet distribution: View a breakdown of your fleets by type (Kubernetes Cluster or Host).
Fleet actions
From the main Fleets page, you can click the ellipses (...) on the far right of any fleet to reveal a menu of actions:
- Edit settings: Allows you to change a fleet's name and description.
- Edit permissions: Allows you to manage the fine-grained access controls (FGA) for the fleet by changing the associated group or role.
- Delete a fleet: Permanently removes the fleet. Before a fleet can be deleted, the following conditions must be met:
- All managed entities must be removed from the fleet.
- The fleet cannot have any deployments currently in progress.
Fleet permissions (fine-grained access)
Fleet Control uses fine-grained access (FGA) to allow administrators to delegate the management of specific fleets to certain users or groups. This is useful when you want to empower a team to manage their own fleets without granting them broad, organization-level permissions.
The primary method for delegating access is by assigning the predefined Fleet Manager role to a user group for a specific fleet. This gives users in that group full control over that fleet, including the ability to create deployments, manage configurations, and add or remove managed entities.
Prerequisites for admin
Creating a fleet grant requires the Authentication domain manager role. If the Fleet permissions action is missing from a fleet's menu, or the modal opens locked, that role is what's missing. For more on delegating access, see manage Fleet Control access.
Setup workflow
The process involves two main steps: first, an administrator creates a user group, and second, they assign that group the Fleet Manager role for a specific fleet.
Step 1: Create a user group
- From the bottom of the left navigation menu, click your user name, then select Administration.
- On the Administration page, select Access Management.
- Go to the groups tab and click Create a new group.
- Give the group a meaningful name (for example,
k8s-platform-team-fleet-managers). - Under the members section, add the users you want to delegate fleet management to.
- Click Add user to the group. You do not need to assign any account or organization-level roles here. Permissions will be granted at the fleet level.
Step 2: Assign a group and a role to a fleet
You can assign permissions either when you create a new fleet or by editing an existing one.
To assign permissions to an existing fleet:
- From the main fleets page, find the fleet you want to manage.
- Click the ellipses (
...) at the end of the row and select Edit permissions. - In the fleet permissions modal:
- Select a group: Choose the user group you created in the previous step.
- Select a role: Choose the
Fleet Managerrole.
- Click Save. The users in the selected group now have full management permissions for this fleet.
To assign permissions during fleet creation:
- Follow the steps for creating a fleet in our setup guide.
- Before you click Create Fleet, in the access management authorization section, use the dropdowns to select your desired Group and the Fleet Manager role.
- Click Create Fleet.
Managing a specific fleet
Clicking on a fleet's name takes you to its detailed management page.
Important: Fleet configuration rules
Fleets are designed to ensure consistency across all their managed entities. To achieve this, three important rules apply:
Managed entity type consistency: Each fleet has a specific managed entity type (Kubernetes Cluster, Linux Host, or Windows Host) that is set when the fleet is created. You can only assign managed entities that match this type to the fleet. This ensures all entities in the fleet are compatible with the same configurations and deployment strategies. See Understanding fleet types for more details.
One configuration per agent type: Within a single fleet, you can only have one configuration for each type of agent. For example, if you have three Kubernetes clusters in a fleet, all of them must use the same single configuration for the New Relic Infrastructure agent. The cardinality for an agent type to its configuration within a fleet is always 1:1.
Exclusive infrastructure instrumentation: The system prevents you from deploying both the New Relic Infrastructure agent and the New Relic Distribution of OpenTelemetry Collector (NRDOT) to the same fleet. This validation helps prevent accidentally double-instrumenting your managed entities for infrastructure monitoring.
The fleet header: Tags and metadata
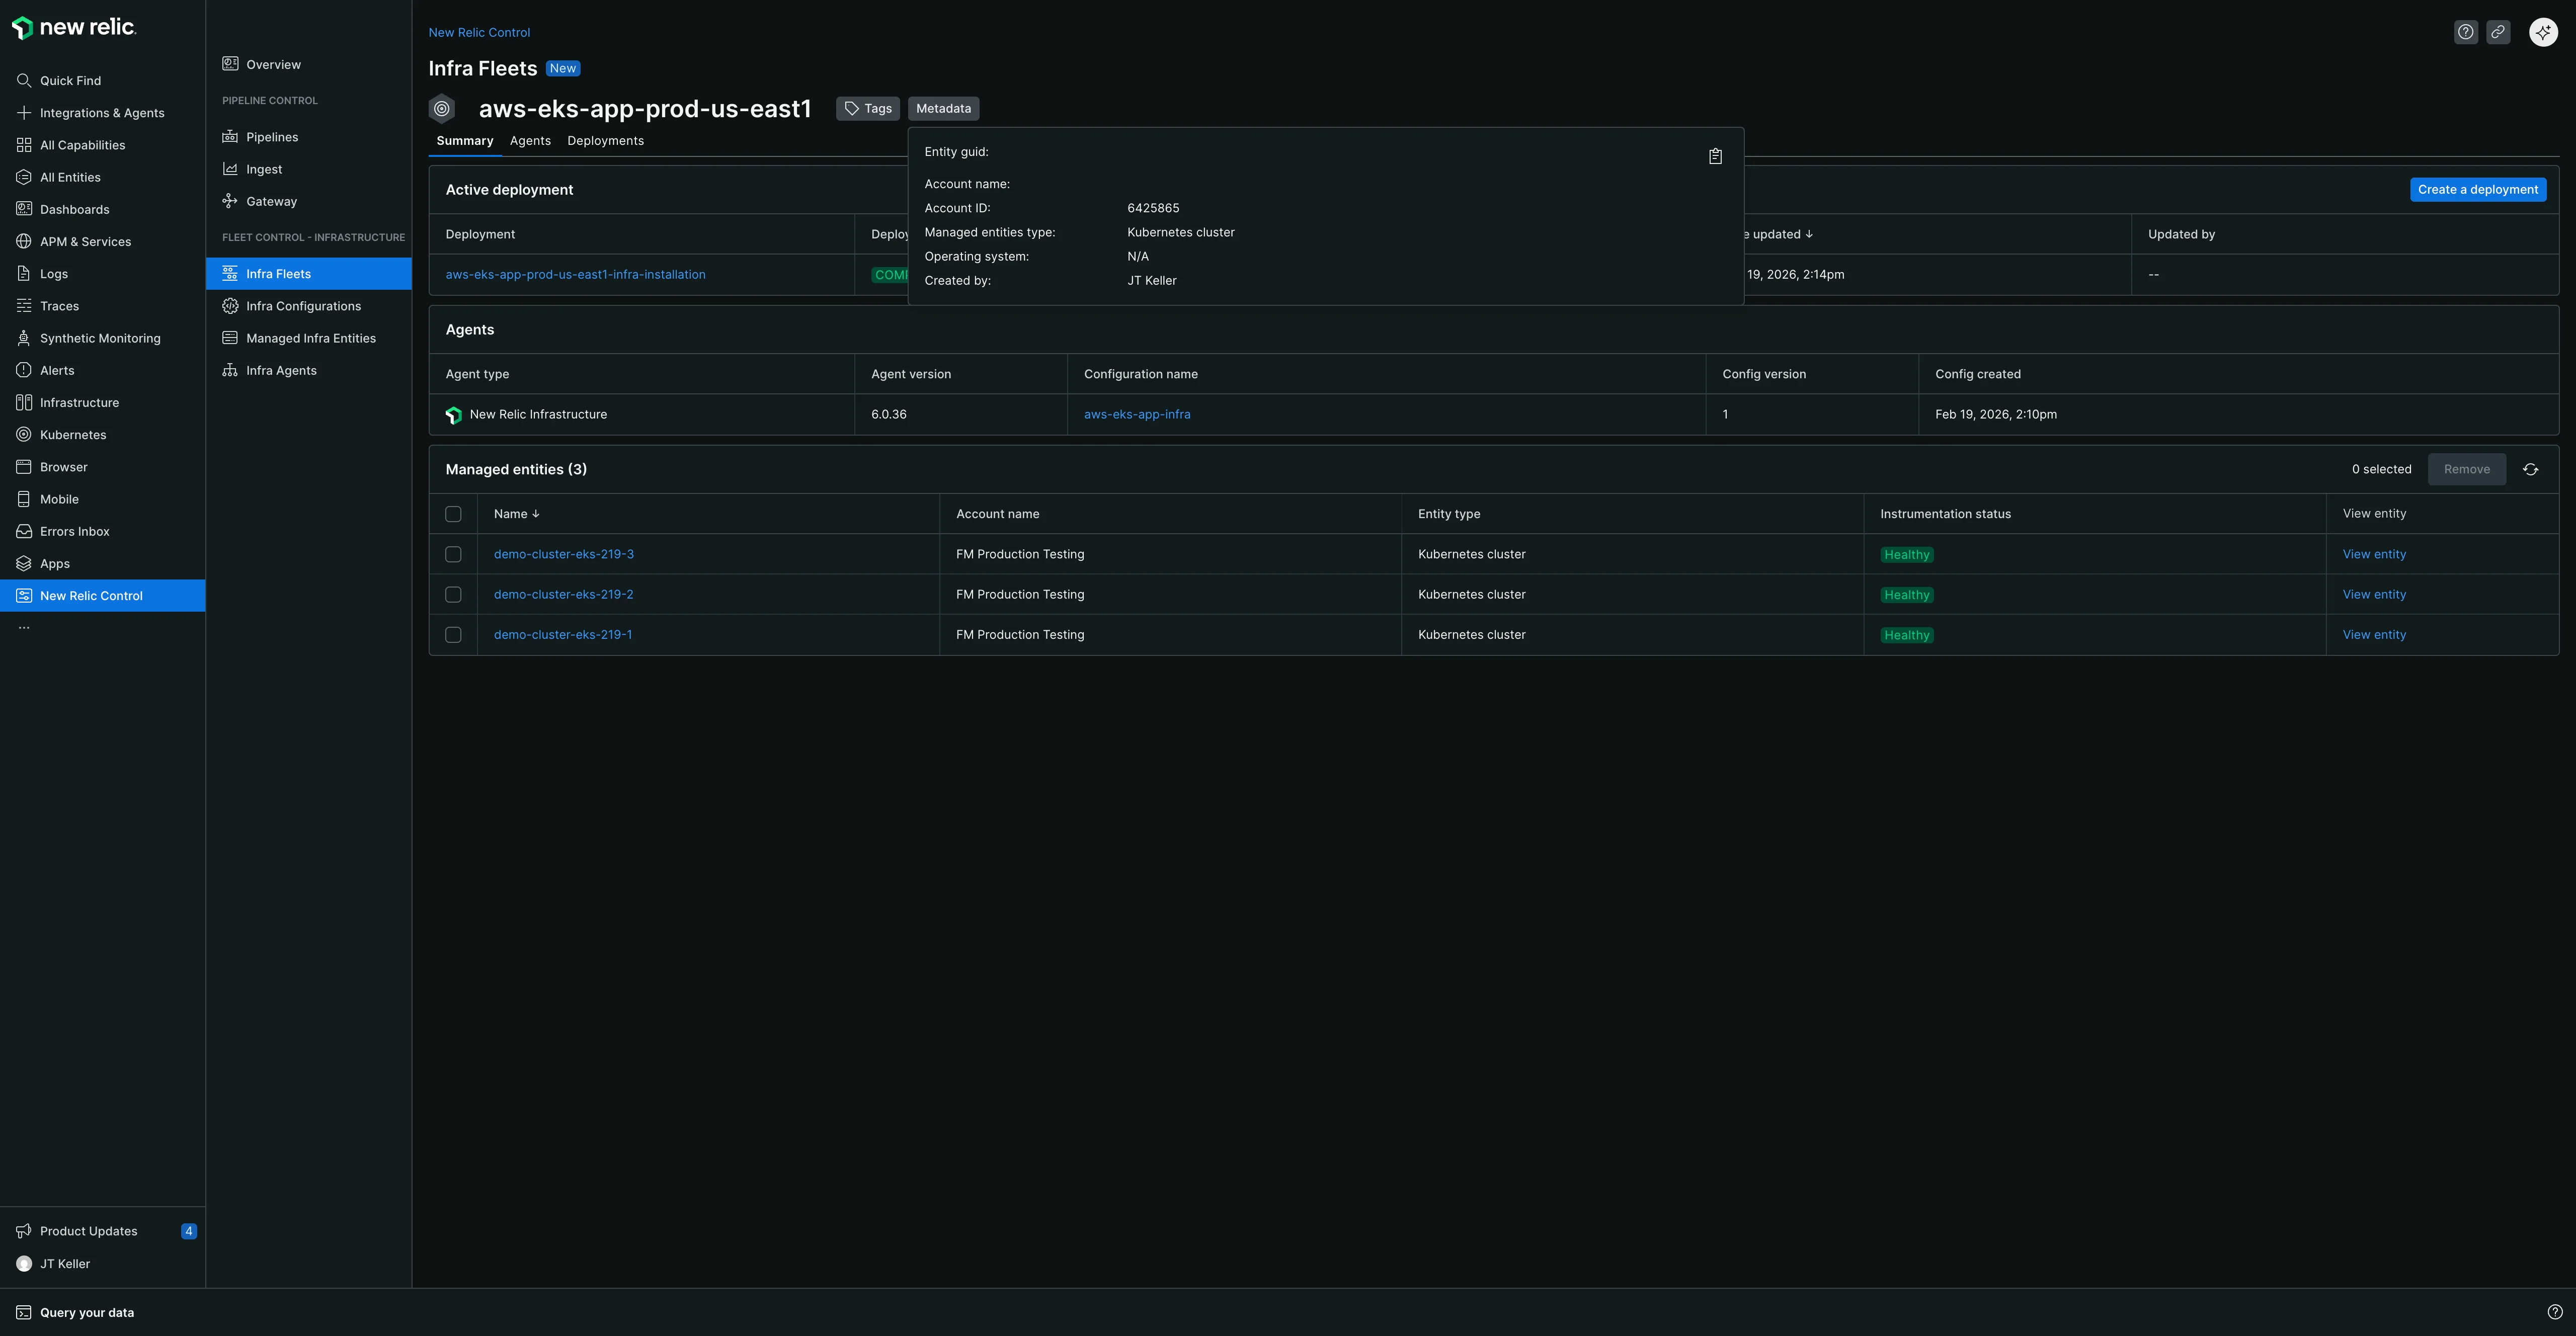
At the top of the page, the header displays the fleet's name along with the clickable Tags and Metadata buttons. These provide quick access to important identifying information for the fleet.
- Tags: Clicking this reveals a comprehensive set of key-value pair data associated with the fleet, such as the
accountId, the fleet'sdescription, and creation or update timestamps. - Metadata: Clicking this displays the core identifying details for the fleet as a New Relic entity, such as its
Entity guid,Account ID, andManaged entities type.
The detailed management page is organized into three main tabs: Summary, Agents, and Deployments.
The Summary tab
This tab provides a snapshot of the fleet's current state, organized into three tables:
- Active deployment table: Shows the name of the most recent deployment, the number of agents/configs included, and the date it was last updated.
- Agents table: Lists the agent types, their associated configurations and versions, and when the configuration was created.
- Managed entities table: Lists all entities assigned to the fleet, their account, type, and current instrumentation status. It also includes a View entity link that takes you to the entity's main page elsewhere in the New Relic platform (for example, the Kubernetes cluster explorer).
The agents tab
This tab provides a detailed view of all agents running on the managed entities within the fleet. You can use the search bar at the top of this tab to find a specific agent by its name or type.
An important detail is that the New Relic Agent Control supervisor is also listed here as an agent type. For each agent, you can see its associated managed entity, instrumentation status, remote configuration status, and when a heartbeat was last received.
View effective configuration
A key feature of the agents tab is the ability to see the effective configuration of any agent. Click on an agent's name to open a detailed view. Here you can see metadata like the Helm chart version, but most importantly, you can view the exact configuration running on the agent in real-time.
The effective configuration can sometimes differ from the configuration you deployed, as it accounts for any overrides from sources like local environment variables. This view is invaluable for troubleshooting configuration-related issues.
The deployments tab
This tab contains the complete deployment history for the fleet. You can use the search bar to find a specific deployment by its name. The table lists each deployment's name, its status, the number of agents/configs, and the last updated date. The most recent successful deployment is marked with an Active label to indicate it's the one currently enforced on the fleet.
Clicking on a deployment's name takes you to a summary view for that specific deployment. This view is organized into two tabs:
Details tab
The details tab provides a summary of the deployment, including:
- Deployment metadata (name, type, description, start/end times, and a deployment ID for troubleshooting).
- An Agents table showing the agent type, the action taken (for example, install, update), and the configuration version.
- A Managed Entities table showing exactly which entities were affected by the deployment and whether they were marked as canaries.
Deployment Events tab
The deployment events tab provides granular, event-level visibility into every action that occurred during the deployment. This tab is essential for troubleshooting deployment issues and understanding root causes. You can:
- View atomic events with details including timestamp, status, managed entity name, agent name, agent type, event type, details, and duration.
- Search for specific events by keyword.
- Filter events by managed entity to focus on a specific cluster or host (useful when troubleshooting failures in large fleets).
- Filter events by status (for example, Completed, Config Applied, Applying).
- Access the underlying NRQL query for advanced troubleshooting by clicking the button to the right of the events table header.
For more information on using the deployment events tab for troubleshooting, see our troubleshooting documentation.
Understanding deployments
A deployment is a controlled set of actions that can install, delete, or update agents and their configurations on the managed entities in your fleet. This section covers key aspects of the deployment lifecycle, including understanding the different deployment statuses, the automatic upgrade process for Agent Control, and how to use advanced features like draft and canary deployments to safely manage changes.
Understanding deployment statuses
The status of each deployment helps you understand its outcome. Here are the possible statuses and what they mean:
| Status | Description |
|---|---|
| 🔵 IN PROGRESS | The deployment is actively being rolled out to the managed entities in the fleet. |
| 🟢 COMPLETED | The deployment has successfully finished, and all intended actions have been applied. |
| 🔴 FAILED | The deployment finished, but at least one agent on a managed entity reported an issue. This could mean an agent failed to start up, shut down correctly, or apply its new configuration. The deployment may be partially successful on other managed entities. |
| 🟠 INTERNAL FAILURE | The deployment could not be completed due to an unexpected issue within the Fleet Control system. This is not an error with your agents or configurations. Please try the deployment again, and if the issue persists, contact New Relic support. |
Understanding deployment event flow
When you view the deployment events tab, you'll see a series of events that represent the lifecycle of your deployment. All deployment events are written to the FleetDeployment custom event type. Understanding this event flow helps you interpret what you see in the deployment events tab and diagnose issues more effectively.
Fleet Control deploys configuration changes in stages called "rings" to reduce risk. The deployment process works as follows:
- If you've designated canary entities: The deployment uses a canary ring first (containing only the entities you marked as canaries), followed by a default ring for all remaining entities. Each ring must complete successfully before the next ring begins. If the canary ring fails, the deployment stops before proceeding to the default ring, preventing widespread issues.
- If you haven't designated any canary entities: The deployment uses only the default ring, which includes all entities in the fleet. The deployment will run to completion across all entities in that single ring.
Deployment event types
The following events track the progress of a deployment from start to finish:
| Event | Description |
|---|---|
| FleetDeploymentStarted | A deployment is initiated for the fleet. Configuration packages are prepared. |
| RingDeploymentStarted | A deployment ring begins (for example, canary or default ring). |
| AgentDeploymentStarted | Configuration deployment begins for a specific agent on a managed entity. |
| AgentDeploymentCompleted | An agent finishes attempting to apply the configuration. |
| RingDeploymentCompleted | All agents in a ring have completed or timed out. |
| FleetDeploymentCompleted | The overall deployment finishes with a final status. |
Agent deployment statuses
When an agent completes its deployment attempt (AgentDeploymentCompleted), it reports one of the following statuses:
| Status | Description |
|---|---|
| CONFIG_APPLIED | The agent successfully applied the new configuration. |
| FAILED | The agent encountered an error applying the configuration. |
| TIMEOUT | The agent did not respond within the expected timeframe. |
| NOT_REPORTING | The agent was offline when the deployment started. |
How the event flow works
When you initiate a deployment, events are generated in the following sequence:
- FleetDeploymentStarted — The deployment begins for the entire fleet.
- RingDeploymentStarted — The first ring (typically canary) starts, and all agents in that ring are identified.
- AgentDeploymentStarted — For each agent in the ring, a deployment event is recorded. These events occur in parallel for all agents in the ring.
- AgentDeploymentCompleted — Each agent reports back with its status (CONFIG_APPLIED, FAILED, TIMEOUT, or NOT_REPORTING).
- RingDeploymentCompleted — Once all agents in the ring complete or time out, the ring is marked complete. If the ring succeeded, the next ring begins. If it failed, the deployment stops.
- FleetDeploymentCompleted — After all rings complete (or a ring fails), the deployment finishes with a final status of COMPLETED, FAILED, or INTERNAL_FAILURE.
Visual event flow
FleetDeploymentStarted│├─▶ RingDeploymentStarted (canary)│ ││ ├─▶ AgentDeploymentStarted (agent 1) ──▶ AgentDeploymentCompleted ─┐│ ├─▶ AgentDeploymentStarted (agent 2) ──▶ AgentDeploymentCompleted ─┤ [parallel]│ ├─▶ AgentDeploymentStarted (agent 3) ──▶ AgentDeploymentCompleted ─┘│ ││ └─▶ RingDeploymentCompleted (canary)│ ││ ├─ ✓ If SUCCESS → proceed to default ring│ └─ ✗ If FAILED → stop deployment│├─▶ RingDeploymentStarted (default)│ ││ ├─▶ AgentDeploymentStarted (agent 4) ──▶ AgentDeploymentCompleted ─┐│ ├─▶ AgentDeploymentStarted (agent 5) ──▶ AgentDeploymentCompleted ─┤ [parallel]│ ├─▶ AgentDeploymentStarted (agent 6) ──▶ AgentDeploymentCompleted ─┘│ ││ └─▶ RingDeploymentCompleted (default)│└─▶ FleetDeploymentCompletedAgent deployment status options:
- ✅ CONFIG_APPLIED — Agent successfully applied the configuration
- ❌ FAILED — Agent encountered an error
- ⏱️ TIMEOUT — Agent did not respond in time
- 📡 NOT_REPORTING — Agent was offline when deployment started
Key identifiers: fleetId, deploymentId, ringName
You can view all of these events in detail using the Deployment Events tab. See the Deployments tab section for more information on accessing and using deployment events for troubleshooting.
Automatic Agent Control upgrades
To ensure your managed entities benefit from the latest security patches, performance enhancements, and features, Fleet Control automatically manages the upgrade process for Agent Control. When you initiate a deployment, Fleet Control checks if a newer version of Agent Control is available for the managed entities in your fleet.
If an upgrade is required, it is automatically included as part of your deployment. You will see a notification in the UI during the deployment process informing you that Agent Control will be upgraded. This implicit upgrade happens alongside any deployment actions you are performing (such as installing agents, removing agents, or changing agent configurations), ensuring your environment stays up-to-date with minimal effort.
Important: Upgrade Failure and Recovery
Currently, there is no automatic rollback for a failed Agent Control upgrade. If an upgrade fails, the deployment will be marked as FAILED, and the managed entity may require manual intervention. For guidance, see our documentation on manually upgrading Agent Control.
Create and manage deployments
You can save a deployment as a draft to work on it over time without deploying the changes immediately.
Create and resume a draft
- Navigate to the deployments tab within a specific fleet.
- Click Create deployment.
- In the deployment pane, provide a mandatory name and an optional description.
- Make any desired changes, such as adding agents or updating their configurations.
- Instead of starting the deployment, click Save draft.
- You can then close the deployment pane. Your new deployment will be listed in the deployments tab with a status of
Draft.
To continue working on the draft, simply click on its name in the deployment history table. This will reopen the deployment pane, allowing you to finish your changes and click Start deployment when you are ready.
Delete a draft
If you no longer need a draft deployment:
- From the deployments tab, click on the name of the draft you wish to delete.
- In the deployment pane that opens, click the ellipses (
...) button next to Start deployment at the top of the screen. - Select Delete draft from the menu.
- The draft will be permanently removed, and you will be returned to the deployments tab.
Selecting agent versions during deployment
When you add an agent to a deployment, you'll be prompted to select an agent version before choosing a configuration:
- After selecting the agent type, a Select a version dropdown appears.
- The latest version is selected by default.
- You can choose from other available versions for installation.
- Additional metadata may be displayed for each version, such as:
- Release notes highlighting new features and improvements
- Security update information
- Other version-specific details
This version selection capability works across all supported infrastructure types (Kubernetes clusters, Linux hosts, and Windows hosts), giving you precise control over which agent version is deployed to your managed entities.
Once you've selected your agent version, click Next to proceed to configuration selection.
Agent actions in a deployment
When you are creating or editing a deployment, the Agents table in the deployment pane provides several actions for each agent. Click the ellipses (...) on the right side of an agent's row to access the following options:
- Edit configuration: Opens the configuration editor, allowing you to modify the configuration for this agent as part of the deployment.
- Use most recent version: If you have created multiple versions of a configuration, this option automatically updates the deployment to use the latest saved configuration version.
- Change configuration version: Allows you to manually select a specific, older version of the configuration to use for the deployment.
- Remove from deployment: Removes the agent and its configuration from this deployment entirely.
Agent version vs. Configuration version
It's important to distinguish between two types of versions in Fleet Control:
Agent version: The version of the agent software itself (for example, Infrastructure agent v1.54.0), selected during the initial agent selection step when adding an agent to a deployment.
Configuration version: The version of the configuration file you've created for that agent, managed through the actions menu above.
When you select "Use most recent version" or "Change configuration version," you are managing the configuration version, not the agent version.
Agent dependencies and conflicts
Some agents can't run together on the same managed entity, and some depend on another agent to run at all. When you are creating or editing a deployment, Fleet Control checks the agents it includes and tells you when a dependency is missing or two agents conflict.
Two rules apply when you deploy to hosts:
- A host runs either the New Relic Infrastructure agent or the New Relic OpenTelemetry Collector, not both. The two can't be installed on the same host, so a deployment can't include both agents.
- On-host integrations depend on the New Relic Infrastructure agent. Integrations such as MySQL, NGINX, and Flex have no process of their own and run under the Infrastructure agent, so a deployment that installs one must include the Infrastructure agent as well. The same applies in reverse: removing the Infrastructure agent from a deployment that still includes those integrations leaves them with nothing to run under.
When a deployment breaks one of these rules, an Invalid configuration combination message appears at the top of the deployment, naming the agent to add or the one to remove. Save draft and Start deployment stay unavailable until you resolve it, so you find out while you're still editing rather than after the deployment starts.
This check governs which agents can ship together. For the separate control over who reviews a configuration's contents before it deploys, see config approvals, which treats on-host integrations as the highest-risk agent type.
Manage entities in a fleet
Important: The principle of fleet inheritance
Fleets operate on a fundamental principle of inheritance. This means any managed entity assigned to a fleet will automatically conform to that fleet's last active deployment to ensure instrumentation consistency. Understanding this behavior is critical when adding or removing entities, as it can result in the automatic installation or uninstallation of agents.
Remove entities from a fleet
- Navigate to the summary tab of the fleet that currently contains the entity.
- In the managed entities table, use the checkbox to select one or more entities you wish to remove.
- Click Remove that appears.
- A verification modal will appear, listing the entities to be removed. To confirm, type
removeinto the text field. - Click Remove entities. The entity is now unassigned from the fleet.
Important: Reverting to local configuration
When a managed entity is removed from a fleet, it automatically reverts to its original local configuration—the state it was in when Agent Control was first installed. This may result in the uninstallation of agents. For example, if the fleet had the Infrastructure and Fluent Bit agents installed, but the entity's local configuration only includes Agent Control, both agents will be uninstalled upon removal to ensure it matches the local state.
Add unassigned managed entities to a fleet
You add an unassigned managed entity to a fleet by creating a new deployment. This process associates the entity with the fleet and its deployed configurations.
- Navigate to the fleet where you want to add the entity and click Create a deployment.
- Give the deployment a meaningful name and description.
- In the managed entities table at the bottom of the deployment screen, click the Add managed entities button.
- A pane will open, displaying a list of all your unassigned managed entities.
- Use the selection boxes to choose one or more entities you wish to add to the fleet.
- Click Add to deployment. The selected entities will now appear in the managed entities table for this deployment.
- Click Save draft and then Start deployment to complete the process. The entities will now be assigned to the new fleet.
Important: Inheriting the last active deployment
When you add a managed entity to a fleet, an implicit deployment occurs in the background. This deployment automatically installs, updates, or removes instrumentation on the new entity to ensure it perfectly matches the fleet's last active deployment. For example, if the fleet's active deployment includes the Infrastructure and Fluent Bit agents, but the new entity previously had only the OTel agent, the OTel agent will be removed, and the Infrastructure and Fluent Bit agents will be installed.
Use canary deployments
Fleet Control allows you to designate one or more managed entities as a "canary" during the deployment process. This provides a crucial safety mechanism for rolling out changes.
When you create a new deployment, you can use the ellipses (...) next to any managed entity in the list and designate it as a canary.
When the deployment starts:
- The changes are deployed only to the managed entities marked as canaries.
- The deployment process pauses and waits for the canary deployments to succeed.
- If any canary deployment fails, the entire deployment stops immediately, and no other managed entities are affected.
- If all canary deployments are successful, the deployment proceeds to the rest of the managed entities in the fleet.
Important: No automatic rollback for failed canaries
If a canary deployment fails, the managed entity it was deployed to will remain in a Failed state. There is no automatic rollback to the previous configuration. You will need to create a new deployment to revert the changes or fix the issue.
The configurations page
Important: Configurations are global
All configurations you create in Fleet Control are global. This means they are available for use across your entire New Relic organization and can be deployed to any fleet that requires them, regardless of who created the configuration.
When you navigate to New Relic Control → Configurations, you land on the main Configurations page, which is the central hub for managing all your agent configurations.
Main page overview
This page provides a high-level overview of all available configurations in your account. From here, you can:
- View summary counts: See your total configuration count.
- See configuration distribution: View a breakdown of your configurations by agent type (for example, New Relic Infrastructure, Fluent Bit, NRDOT collector).
- Search for configurations: Use the search bar to find a specific configuration by its name or associated agent type.
- Refresh the list: If you have just created a new configuration and don't see it in the table, click the refresh button located to the left of Create configuration.
The page displays a table of your configurations with the following columns:
- Configuration: The name of the configuration.
- Agent: The agent type the configuration applies to.
- Revisions: The number of versions that exist for the configuration.
- Type: The managed entity type (for example, Kubernetes Cluster, Linux Host, or Windows Host).
- Last modified: A timestamp of the last update.
Configuration actions
From the main configurations table, you can click the ellipses (...) on the far right of any configuration to Edit it. This opens the main editing pane where you can modify the configuration file. This view also provides buttons to Download the configuration file to your local machine or Copy its contents to your clipboard.
Understanding configurations
The structure of a configuration file depends on the Managed Entity Type you select (Kubernetes Cluster, Linux Host, or Windows Host).
- For Kubernetes clusters, the configuration you create in the UI is a
values.yamlfile. During deployment, Fleet Control packages this file with the agent's Helm chart to configure it on your cluster. The templates for Kubernetes agents are structured as a canonical Helm chartvalues.yamlfile. Near the top of the template, you'll find a commented-out link to the agent's Helm chart in the New Relic Helm Charts GitHub repository. This allows you to easily reference the schema, available values, and other agent-specific documentation. - For hosts, the configuration file format is specific to the agent being deployed.
Configuration filtering in deployments
When creating a deployment for a fleet, the system automatically filters available configurations to show only those that match the fleet's managed entity type. For example:
A Kubernetes Cluster fleet will only display configurations created for Kubernetes clusters.
A Linux Host fleet will only display configurations created for Linux hosts.
A Windows Host fleet will only display configurations created for Windows hosts.
This automatic filtering ensures you cannot accidentally deploy an incompatible configuration to your managed entities, maintaining consistency and preventing deployment failures.
Security best practice: Managing sensitive data in Kubernetes
For Kubernetes deployments, never include sensitive data like your licenseKey directly in configuration files. Instead, use Agent Control's value providers to securely inject sensitive values at runtime. For more information, refer to the value providers documentation.
Create a configuration
To create a new global configuration from scratch:
- From the main Configurations page, click Create configuration.
- In the modal that appears, you must:
- Select the managed entity type (Kubernetes Cluster, Linux Host, or Windows Host).
- Select the Agent type from the dropdown menu. This covers agents such as New Relic Infrastructure, the NRDOT collector, and Fluent Bit, as well as on-host integrations such as MySQL, NGINX, and Flex. The available agent types will be filtered based on the managed entity type you selected.
- Provide a meaningful and unique Name for the configuration.
- Click Continue. This opens the configuration editing view, which is split into two panes.
- Left Pane (Active Configuration): This is where you author your configuration. You can type directly into this pane or paste content from another source.
- Right Pane (Template): This pane contains the latest default template for the agent type you selected. These templates provide the minimal required settings to run the agent, but they also include many additional commented-out options. You can use these examples for reference or uncomment them to build a more custom configuration.
- A common workflow is to click Copy in the template pane and paste the contents into the active configuration pane on the left to use as a starting point.
- Once you are satisfied with your configuration in the left pane, click Save. The editing view will close, returning you to the main configurations page where you can find your new configuration. If your organization requires approval for this agent type, saving submits the version for review instead of making it available right away — see Config approvals.
View and version a specific configuration
To see more details about a configuration and manage its versions, click on its name in the main list. This opens a detailed pane for that specific configuration.
This view shows you:
- The configuration's name, agent type, and a list of its available versions.
- The deployment status, which indicates if the configuration has been deployed to any fleets and, if so, which ones.
- The approval state of each version, if your organization requires approval for this agent type. See Config approvals.
From this pane, you can also perform several actions like Download, Copy, and Clone. The primary action here is creating a new version of the configuration.
To create a new version:
- Click Add new version.
- This opens the editing pane where you can modify the configuration.
- When you are finished with your edits, click Save.
- You will be returned to the main configurations page, and you will see the revisions count for that configuration has incremented by one.
If you click back into the configuration, you can now select the new version from the list to view it.
Existing versions can't be edited. Creating a new version is how you change a configuration, which keeps a record of what changed over time and means an approved version stays exactly as it was when it was reviewed.
Delete a configuration and its versions
To delete a configuration, you must first delete all of its individual versions. The parent configuration is automatically deleted once its last version is removed.
Important: Deletion Restriction
You cannot delete a configuration version that is currently part of an active deployment. The Deployment status section in the configuration details pane will show you which fleets a version is deployed to. Before you can delete it, you must first create a new deployment for those fleets that uses a different configuration version.
To delete a configuration version:
- Navigate to the configurations page.
- Click on the name of the configuration you wish to modify to open its details pane.
- On the left, you'll see a list of all its versions. Hover over the version you want to remove and click the ellipses (...) that appears.
- Select Delete from the menu.
- Repeat this process for all remaining versions. Once the last version is deleted, the parent configuration will be removed from the list on the main configurations page.
Clone a configuration
Cloning is a fast way to create a new configuration based on an existing one.
- On the main configurations page, click the ellipses (
...) button located next to the main Create configuration. - From the dropdown, select the existing configuration you want to use as a starting point for your clone.
- This opens the same two-pane editing view, pre-populated with the content of the configuration you selected.
- You can now author your new configuration and save it.
Config approvals
An approval policy is required before anyone can deploy
An Organization Manager must set up an approval policy before anyone in your organization can create new deployments.
Deployments that are already running are never affected.
Config approvals require at least one person other than the author to approve a configuration version before that version can be used in a deployment. If you've used pull request reviews with a Git provider, the workflow will feel familiar: a reviewer reads the configuration and then approves it, requests changes, or denies it.
The reason this matters is that Fleet Control manages configurations remotely. A user can author a configuration and push it to production infrastructure across your fleets from a central control plane, rather than editing files on individual hosts. Config approvals put a second set of eyes on that path, so no single person can author a configuration and deploy it on their own.
Approvals apply to configurations for every agent type you choose to include, across both infrastructure and APM.
Set up an approval policy
Your organization has no approval policy until someone creates one. Setting one up requires the Organization Manager role, or a custom role carrying the policy capability.
- In the left navigation, go to New Relic Control → Fleet Control Settings → Approvals.
- If your organization has never set up a policy, you'll see a prompt to create approval policies for config changes. Click through to start.
- Under Governance for agent types, select the agent types that should require approval. Every agent type that supports approvals is selected for you by default, so you can deselect the ones you don't need rather than building the list from scratch.
- Set the minimum number of approvals. This defaults to
1and can be raised as high as5. The count refers to approvals from people other than the author, so a minimum of1means two people have seen the configuration: the author and one approver. - Click Save.
To discard unsaved changes, click Reset. This returns the form to your organization's saved policy, so it undoes your edits rather than clearing your policy. If you have not saved a policy yet, it returns the form to its starting state with every agent type selected.
If you don't have permission to create a policy, the page tells you so and directs you to contact an administrator. Ask whoever holds the Organization Manager role in your organization to complete the setup.
We recommend requiring approval for every agent type
Because Fleet Control configurations are managed remotely rather than locally on each host, any agent type you leave out is one a single user can author and deploy without review. We recommend requiring approval for all of them, then relaxing it only where you're confident you don't need it.
If you leave any on-host integration ungoverned, saving prompts you to acknowledge the risk before the change takes effect. On-host integrations can execute scripts on your hosts, which makes them the highest-impact configurations to leave unreviewed. NRI Flex is the most widely used example. The acknowledgment is a confirmation step, not a restriction: you can save the change once you've accepted it.
Approvals govern a configuration's contents. Separately, Fleet Control validates which agents can be deployed together, which matters for on-host integrations because they can't run without the Infrastructure agent. See agent dependencies and conflicts.
Agent types excluded from approvals
Two kinds of configuration are permanently excluded, for different reasons:
- Agent Control: It's the supervisor rather than an agent. Fleet Control works through Agent Control to carry out every lifecycle operation, so requiring approval on it would gate the mechanism that performs all of your other approved changes.
- Pipeline Control Gateway (including Config Mode): Pipeline Control owns these configurations. Fleet Control delivers them, but they are authored and managed in Pipeline Control.
Every other agent type available to your organization can be set to require approval.
Understanding approval states
Configuration versions are immutable. Editing a configuration always produces a new version rather than changing an existing one, which means an approved version stays exactly as it was when it was reviewed. Each version is approved on its own.
A version that requires approval moves through these states:
| State | What it means |
|---|---|
| Awaiting approval | The version has been submitted and is waiting for review. It cannot be used in a deployment yet. The banner shows progress toward the required count, for example 0 of 1 approvals. |
| Changes requested | A reviewer has asked for changes. Because versions are immutable, you respond by adding a new version rather than editing this one. |
| Approved | The required number of approvals has been reached. The version can be used in any deployment. |
| Denied | A reviewer has blocked this version permanently, and the version shows the reviewer's reason. Denial is the only state a version cannot move out of. To proceed, add a new version from it. |
An approved version can still be denied later. If a reviewer approves a configuration and afterward notices a problem, such as sensitive data that should not be there, denying it immediately stops anyone from deploying that version. This is deliberate: it lets you take a problematic configuration out of circulation at any point, not only during the initial review.
Author a configuration that requires approval
When you create or edit a configuration for an agent type that requires approval, the editor tells you so before you save, and saving submits the version for review rather than making it immediately available.
- Author your configuration as usual.
- Click Save. The version is saved and submitted for review in one step. There is no separate submit action.
- On the main configurations page, the configuration appears with a lock icon, indicating it requires approval. Its current state is shown alongside it.
You cannot deploy the version until it reaches the approved state.
To respond to a reviewer's feedback, add a new version:
- Click the configuration's name to open it. This view lists the configuration's versions along with their approval states, so you can see which version was denied or had changes requested.
- Click Add new version. The editor opens with a copy of the configuration's latest version, so a request for a small change does not mean starting over.
- Click View configuration history to read what your reviewers said. This shows request-for-changes comments, denial comments, and the approval activity recorded against the configuration over time, across all of its versions.
- Make your changes and save the new version. It starts its own review.
Each configuration has a parent record with its versions as children. View configuration history spans them, so it doubles as an audit trail for who reviewed what and when. To retrieve identifiers for troubleshooting, use View metadata, which shows the configuration ID for the parent and the configuration version ID for the specific version you're viewing.
Review a configuration
Reviewing requires the Organization Manager role, or a custom role carrying the approval capability.
Open the configuration version and choose one of three actions:
- Approve: Records your approval. A comment is optional. Once the version reaches the required number of approvals, it can be used in deployments immediately.
- Request changes: Asks the author to revise. Use this when the configuration is close but needs specific edits. Say which lines and why, since the author sees your comment in the configuration history.
- Deny: Blocks the version permanently. Use this when the configuration should not proceed at all rather than needing edits. The author must add a new version.
You'll be asked to confirm approvals and denials before they're recorded.
You cannot approve your own configuration
The author of a version cannot approve it, even if they hold the approval capability. This is the core control the feature provides, and it's enforced by the API as well as the interface, so it cannot be bypassed by calling the API directly.
Your own submissions don't appear in your pending review queue.
Make sure enough people hold the approval capability to cover the time zones your team works across. If your minimum approval count is higher than the number of available approvers, configurations will sit unreviewed.
Find configurations awaiting your review
If configurations are waiting on you, a card at the top of the configurations page shows how many need review. Click Show pending configurations to open a drawer listing everything awaiting approval, so you can see the queue at a glance and jump straight into any item to start reviewing.
Delegate approval authority
Both capabilities, approving configuration versions and setting up the approval policy, belong to the Organization Manager role by default. There is no predefined approver role, so if you want anyone else to approve configurations, an Organization Manager creates a custom role and grants it to a group.
Both capabilities are organization-scoped, which means the custom role has to be an organization-scoped role. An account-scoped or entity-scoped role cannot carry them, and creating the role is only half the job: permissions don't take effect until you link the role to a group with an access grant.
Important: What to know before creating an organization-scoped custom role
Creating custom roles is available to organizations with Pro or Enterprise editions. If your organization cannot create custom roles, approving configurations remains limited to holders of the Organization Manager role.
Custom organization-scoped roles also do not pick up new permissions automatically. Standard roles receive the permissions for new organization-scoped features as they ship, but a custom role only ever contains what an administrator added to it. If Fleet Control adds governance capabilities later, someone has to add them to each custom role that should have them.
To create the role:
- From the bottom of the left navigation menu, click your user name, then select Administration.
- On the Administration page, select Access Management, then go to the roles tab.
- Click Add a role.
- For the role's scope, choose Organization, then click Next.
- Give the role a name that will make sense to whoever maintains it later, for example
Config Approver. - Find the Fleet Control section and expand it.
- On the Fleets (all) row, under Other, select the capabilities this role should carry:
- Approve configurations: Lets holders act on configuration versions awaiting review.
- Configure organization governance: Lets holders set up and change the approval policy, including which agent types require approval and the minimum approval count.
- Save the role.
Grant these independently based on what each group needs. Someone who should review configurations but should not be able to change which agent types require approval needs only Approve configurations.
To assign the role:
- In Access Management, go to the access grants tab.
- Click Create new grant.
- Pair the group whose members should approve configurations with the role you created, targeting your organization.
Roles are assigned to groups rather than to individual users, so add people to the group to give them approval authority and remove them to take it away.
Because approval authority is organization-scoped, an approver can approve any configuration version in the organization. Configurations in Fleet Control are organization-level objects rather than belonging to a specific fleet, so an approved version can be used in any fleet's deployments. Scoping approvers to particular fleets, or setting a different approval policy per fleet, is not supported.
The main managed entities page
When you navigate to New Relic Control → Managed Entities, you get a centralized view of all your managed entities, which are Kubernetes clusters or hosts with Agent Control installed. This page serves as your complete asset inventory for any entity capable of being managed by Fleet Control and is organized into two tabs: Fleet managed and Unassigned.
Fleet managed tab
This tab lists all the managed entities that are currently assigned to a fleet. The table provides the following information:
- Entity name: Clicking the name takes you directly to that entity's explorer experience in the New Relic platform (for example, the Kubernetes cluster explorer).
- Entity type: The type of the managed entity (for example, Kubernetes cluster or host).
- Instrumentation status: The current health status of the instrumentation on the entity.
- Fleet: Which fleet the entity is currently assigned to. You can click the fleet name to navigate directly to that fleet's management page.
- Account name: The New Relic account associated with the managed entity.
Unassigned tab
This tab provides a list of all managed entities that have Agent Control installed but are not currently assigned to any fleet. The table provides the following information:
- Entity name: Clicking the name takes you directly to that entity's explorer experience in the New Relic platform.
- Entity type: The type of the managed entity.
- Instrumentation status: The current health status of the instrumentation.
- Account name: The New Relic account associated with the managed entity.
This view is particularly useful for identifying which of your assets are not yet being managed by Fleet Control. It is a best practice to assign all managed entities to a fleet to ensure they are consistently configured and monitored.
The main agents page
When you navigate to New Relic Control → Agents, you get a global overview of all the agents being managed by Fleet Control across your organization.
At the top of the page, you'll find summary cards that provide a quick look at your agent health, including:
- A count of all connected agents.
- A count of disconnected agents, helping you quickly identify agents that may need troubleshooting.
- A distribution of your top 500 agent types.
Below the summary cards, a comprehensive table lists all your managed agents. You can search this table by agent name and filter it by agent type or reporting status. The table includes the following columns:
- Type: The type of the agent (for example, New Relic infrastructure).
- Agent Name: The specific name of the agent.
- Managed Entity: The managed entity the agent is associated with.
- Connection Status: The current connection status of the agent.
- Fleet: The fleet the agent is a part of.
- Agent Version: The version number of the agent.